Microscope Focus Stacking for Part Inspection (on a Budget)
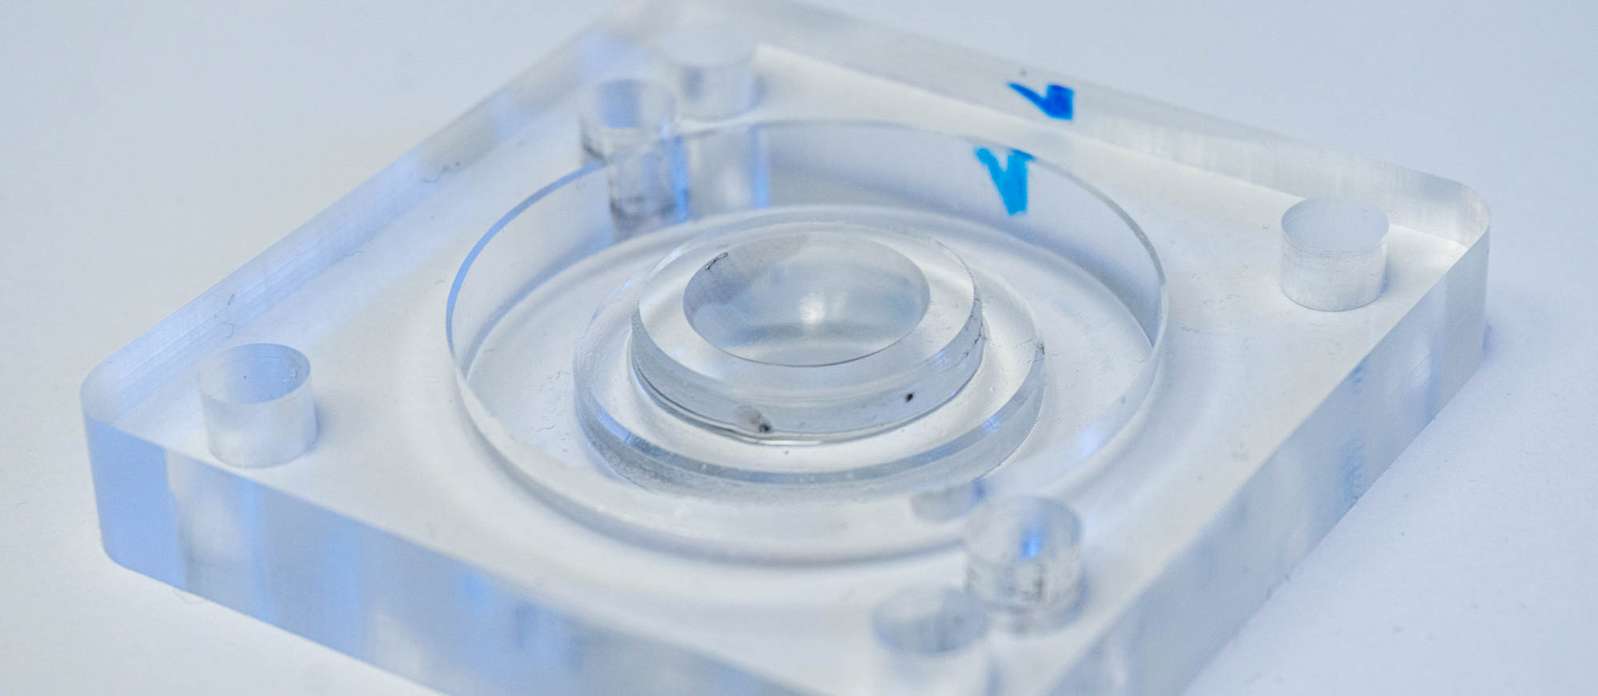
14 Oct 2022Recently I found myself on a yak shaving detour in dire need to look at some very small things. In my particular case: to assess scratches after consecutive grinding and polishing steps of a lens mold. Basically, I polished a cavity and needed to know if the scratches of the prior grind size have been removed by the current grain size so I can move on to the next one. For that, I needed some cheap microscope objectives with a bit of magnification (4x to 10x). The problem: the focal plane of these objectives is very, very shallow. Since I want to look top down at the curved cavity meant for molding lenses, I needed to cover quite a bit of distance.
The simple solution to this problem is focus stacking. Just take several images while moving the microscope lens just a fraction of a millimeter and combine only the sharp areas of those images afterwards.
There are a few noteworthy microscopy projects out there that work towards more accessible and open-source imaging:
The OpenFlexure project developed a 3-axis movement stage with micrometer precision, based on deforming a cheap 3d-printed part. They have some options for microscope objectives based on cheap Raspberry Pi cameras and that stuff seems to work well for biology samples, ie. looking at tiny cells on a small glass slide with 50-100x magnification.
UC2 (or you see, too), is a wide collection of building blocks (like, literally blocks) for modular microscopes. Documentation looks pretty extensive and they seem to have a lot of options for rather fancy imaging techniques.
However, both projects did not really have a simple solution for my particular problem (large parts, low magnification), so I set out to build my own very simple microscoping rig.

For that a bit of electronics, hardware, and software is necessary:
Electronics & Sensor
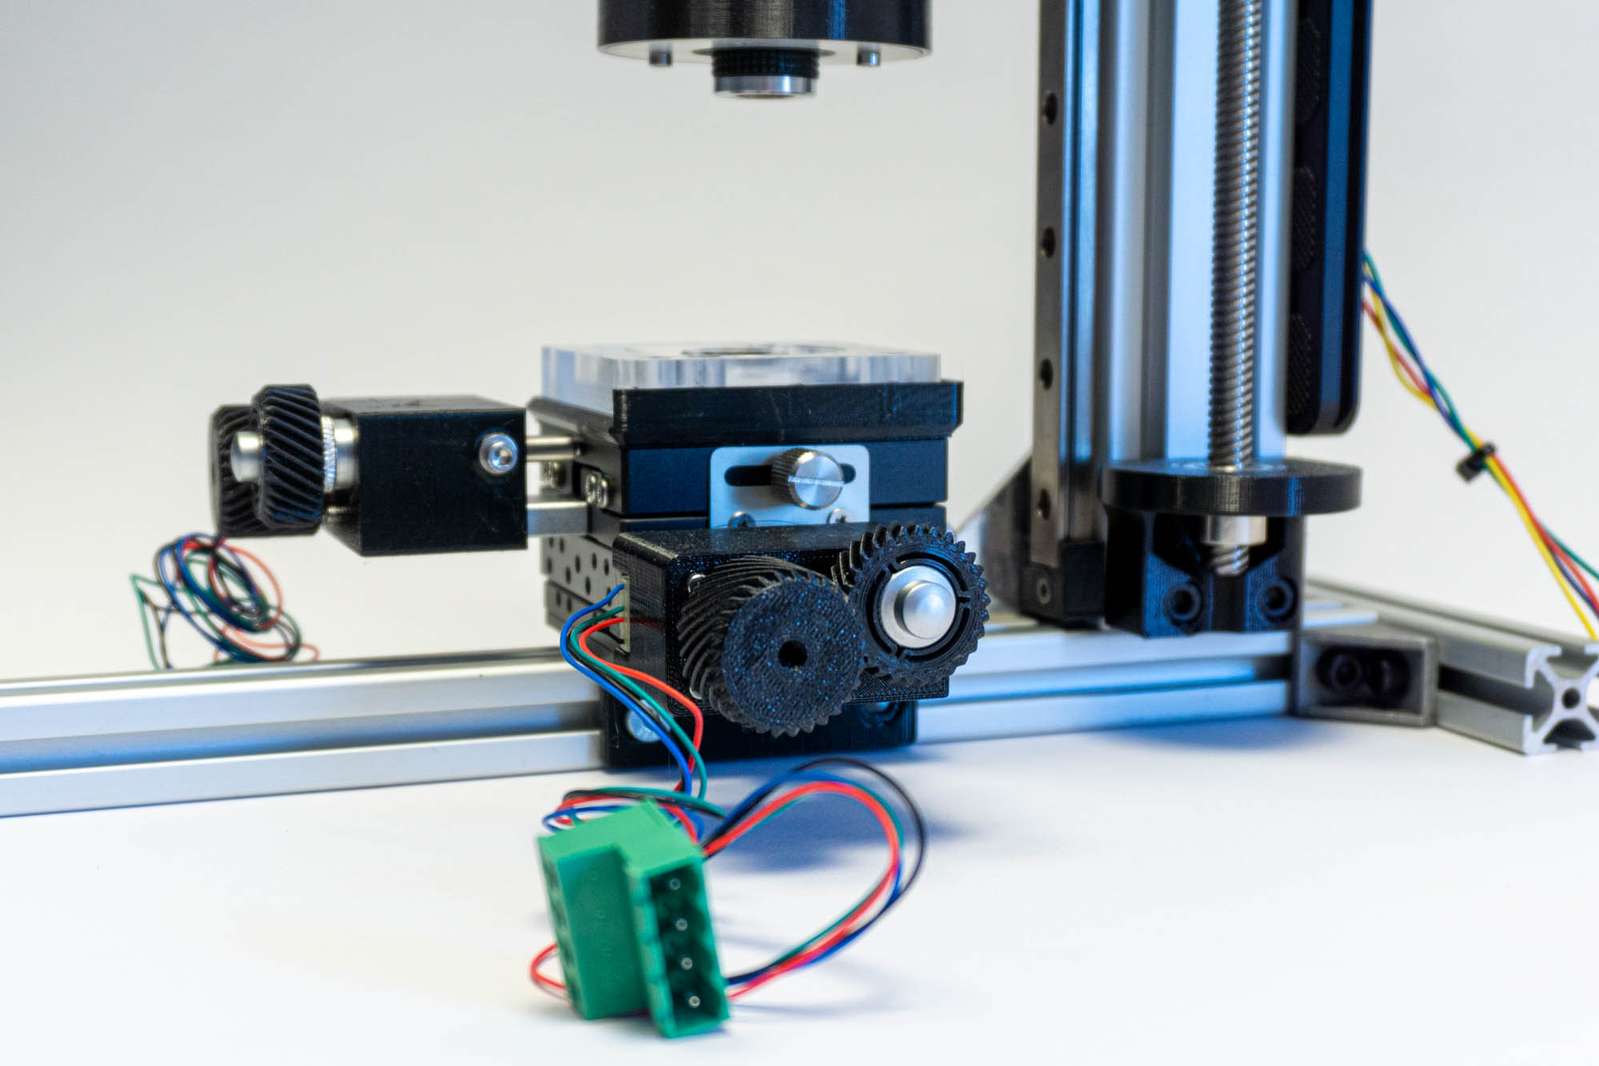
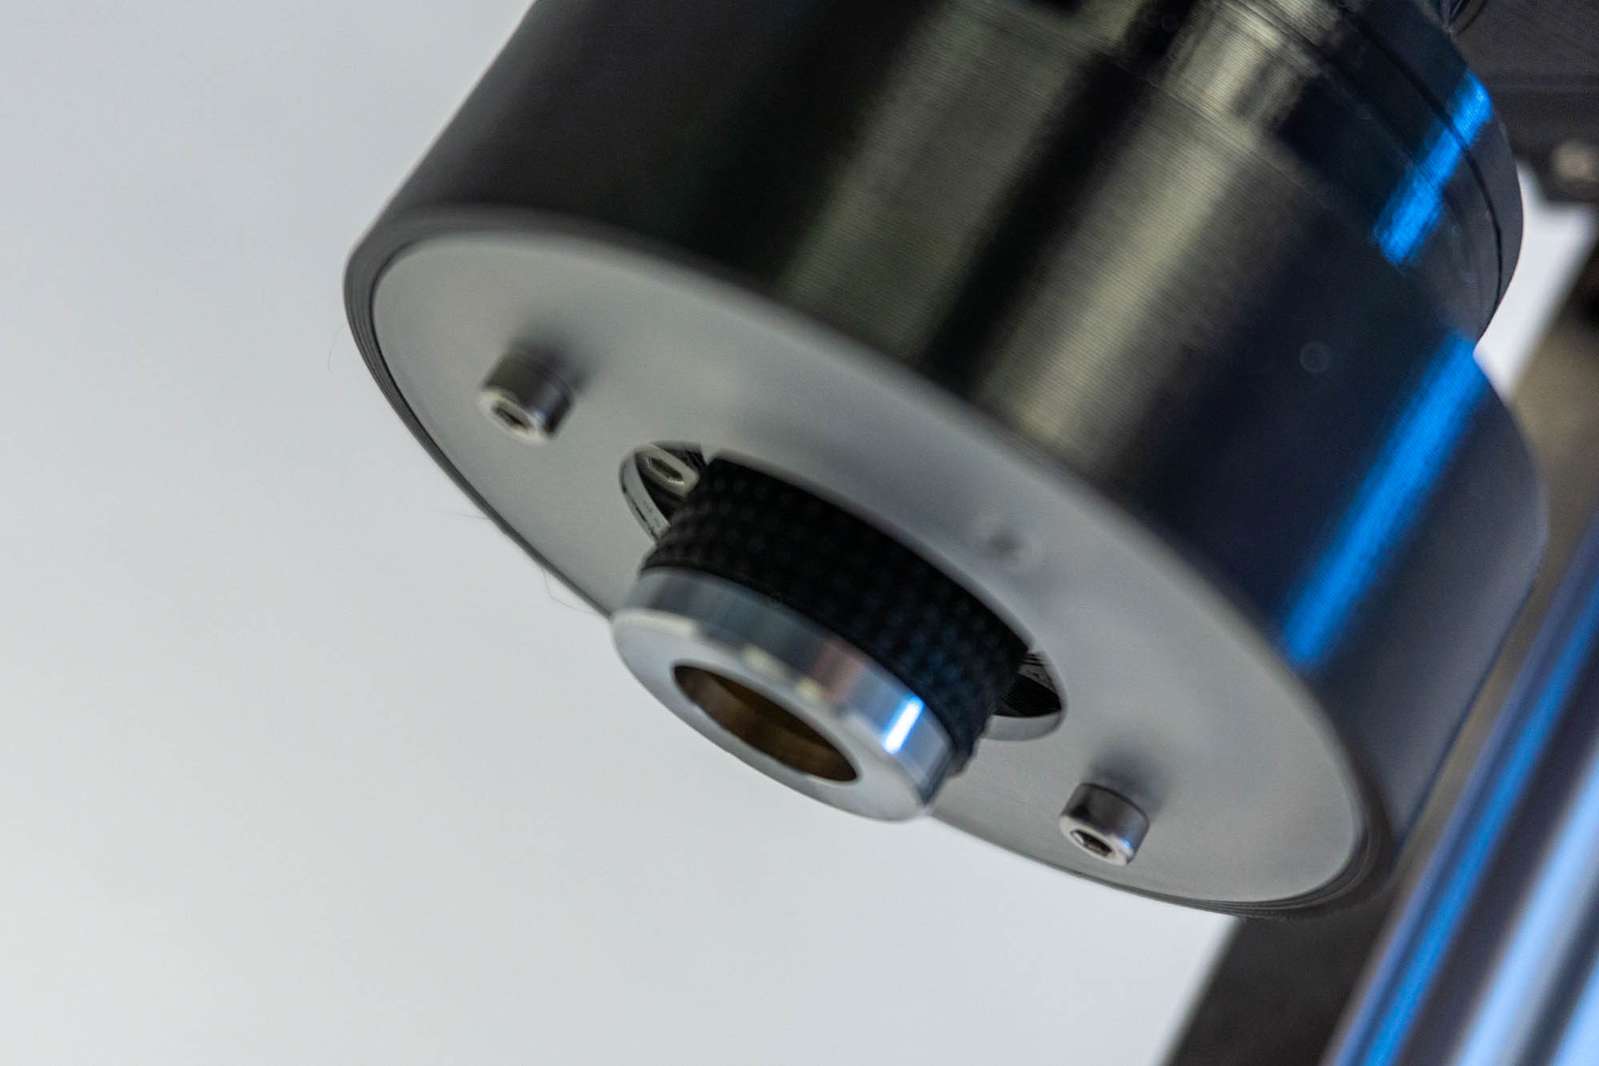
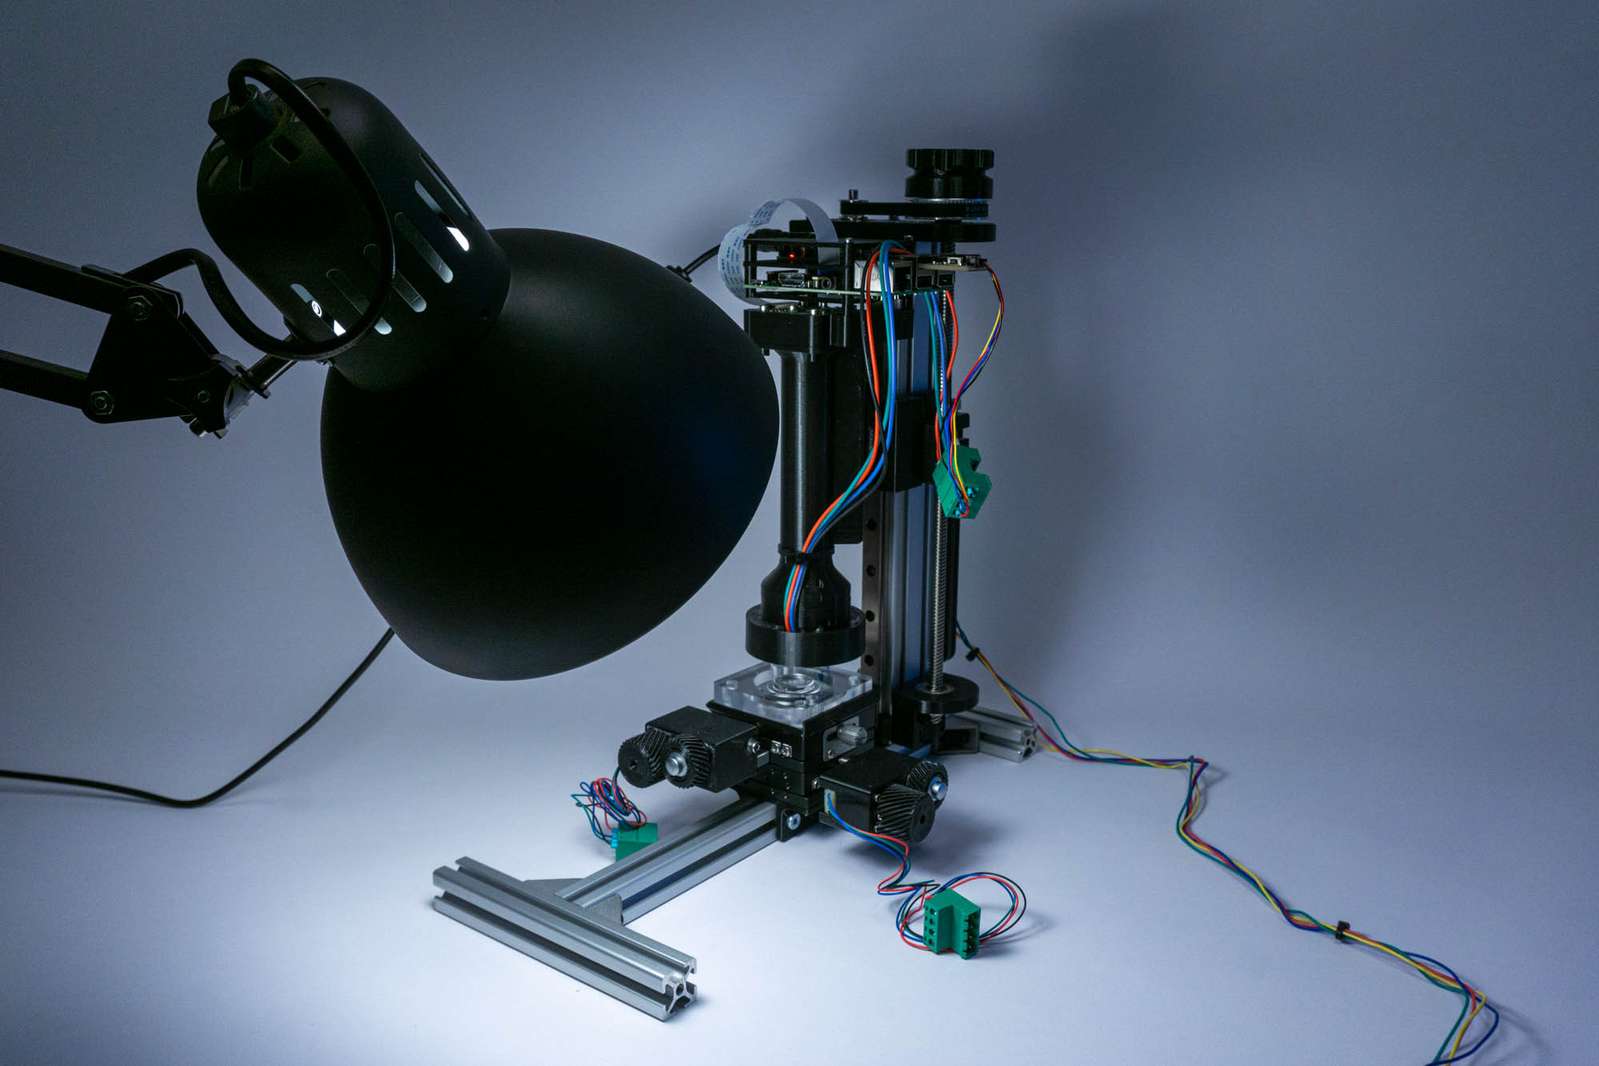
The first version of the DIY microscope made use of a Sony A6000 with a 3d printed spacer for the microscope lens. This did work fine and the large APS-C sensor covered quite a field of view with the microscope objective. I controlled the camera using gphoto2 from a Raspberry Pi. But moving the camera, taking a picture, and loading it from the internal storage to the pi is slow and tedious. In addition to that, I don’t want to torture the mechanical shutter of the camera excessively. The easier solution is using a Raspberry Pi HQ camera module and 3d-printing a spacer for the objective. The sensor is considerably smaller so the field of view is narrower, but it’s faster, is controlled directly by the pi, and doesn’t have a mechanical shutter.
The motor responsible for moving the microscope objective closer to the camera is controlled by a Fysetc E4 running fluidNC. That is basically a grbl-compatible firmware for ESP32 boards instead of the good old AtMega328. The big advantage of fluidNC on the Fysetc E4 board is that you can just load a config file with steps-per-mm and motor current settings and fluidNC takes care of configuring the very silent TMC2209 stepper drivers on the board accordingly. It’s a very versatile combination that requires minimal effort.
I am not using a gcode sender but my own camera slider python script, which works well for this simple job. General procedure: use picamera to take an image, tell fluidNC to move the Z axis by a few steps, take the next image, and so on…
Hardware

As a linear actuator, I am using components I originally intended for a macro rail (which kind of makes sense). A 270mm 40x20 aluminium extrusion with a 250mm MGN12H linear rail from Aliexpress. A 1.8-degree stepper motor with a GT2 belt spins an 8mm ACME leadscrew. The pulleys for the GT2 belt have a 3:1 gear ratio, and the leadscrew has a 2mm pitch. This gives us a theoretical resolution of 3.33 microns per step.
The 3d-printed tube holding microscope objective, camera module, and Raspberry Pi are clamped with an Arca Swiss plate to the linear rail carriage. Both Arca plate and clamp are from Mengs Photo, my preferred purveyor of low-price photo parts.
The X and Y axes are controlled by a micrometer XY-stage from Aliexpress. I got the Idea and purchase information from UC2, you can find them in the UC2-MicronStage repository. However, mostly I am just moving them manually to set the position once, not making use of the stepper motors.
The microscope objectives I use are just some cheap generic ones from Amazon for about 20 Euro each (4x, 10x). They come with an RMS thread as their only mounting option, so they need to be screwed either in an RMS adapter or an RMS thread needs to be cut into a machined holder (Thorlabs is selling the correct tap). I just printed a sufficiently similar thread with the 3d-printer and used a bit of force, so the metal thread on the objective cuts its way into the plastic. Not the most elegant solution but it works well.
Illumination
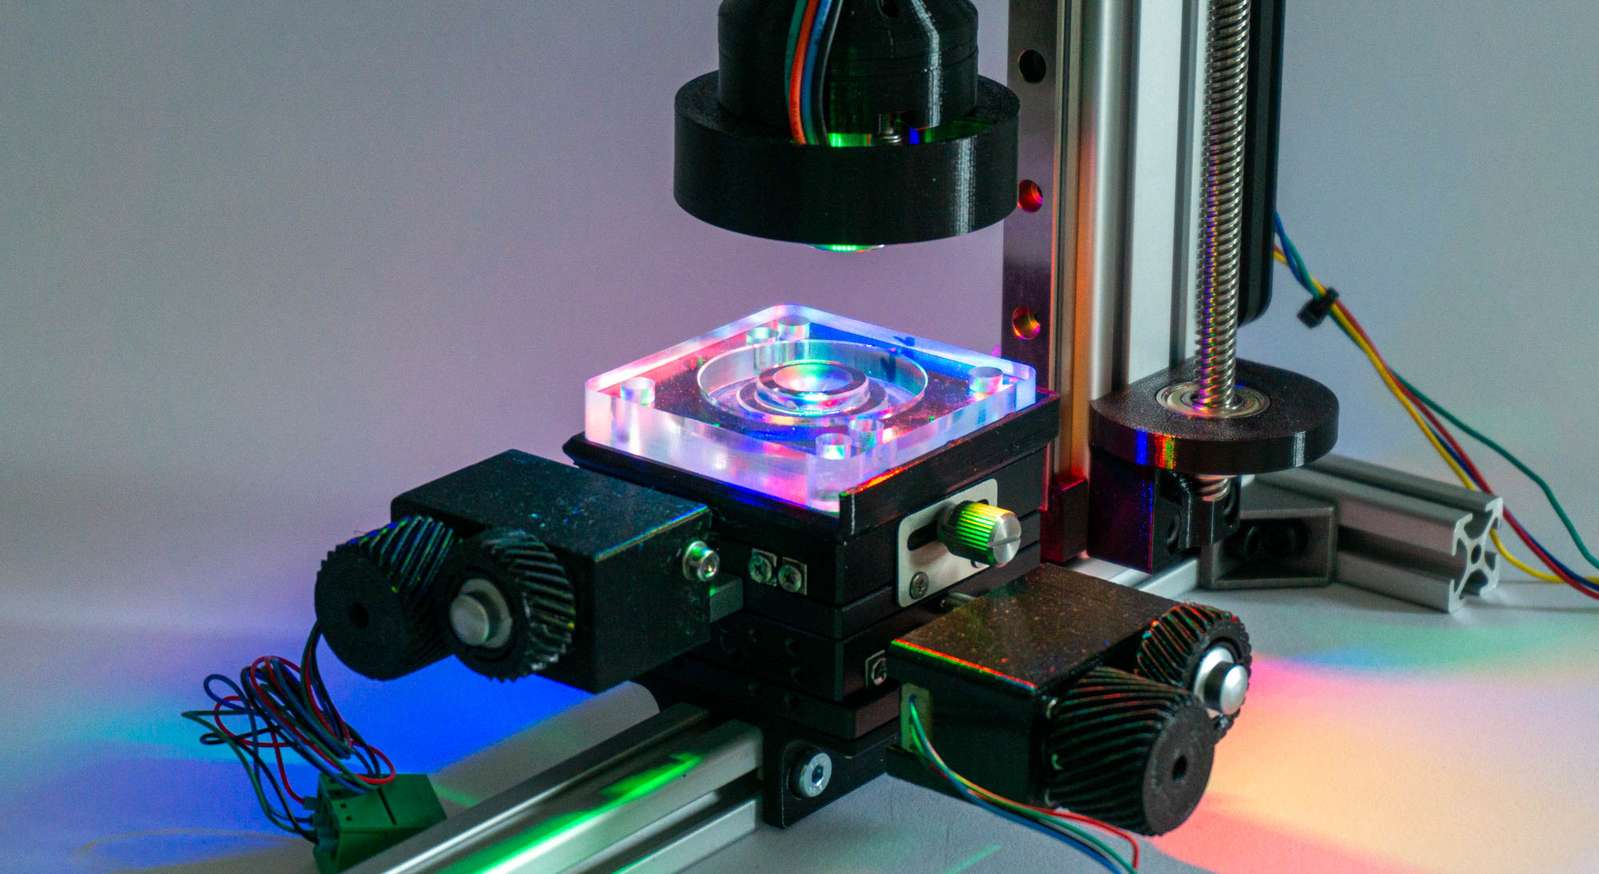
I tried to be clever and use an RGB ringlight mounted around the microscope objective. By selectively mixing colors and controlling the direction of light you can highlight the direction of scratches.
The problem is that the geometry of the ring light (position and diameter) only work well in a rather narrow set of situations and even then it is slightly dim.
While the camera sensor could just expose a bit longer and compensate for the dim LEDs, that’s a pain with the Raspberry Pi camera driver, so I tried to avoid that. The simplest solution was just too use a very bright lamp (1000 lumen) and flood the whole area with light at an angle.
Software
I tested a few pieces of software in the process of finding something that works for me:
- Helicon Focus is apparently the first choice for many macro photographers. It’s fast and results are okay, however, the cheapest lifetime license was 119 Euro at the time of writing and that’s a bit too expensive for what I intent to use it for.
- Zerene Stacker has a 30-day trial and I was pleasantly surprised. Very easy to use, reliable, and has keyboard shortcuts to speed up the workflow. However, it’s a bit expensive for my taste as well.
- ImageJ is the well-established (Java) software for microscopy image analysis. However, it is horrible to use. Fiji (Fiji Is Just ImageJ) is an installer and add-on bundle that should make using ImageJ more convenient and it does alleviate the pain a bit, but only a bit. I tried focus stacking using the Extended Depth of Field plugin by the Biomedical Imaging Group. It looks pretty fancy at first glance and there are a lot of features like 3d depth maps, but I couldn’t find settings for the built-in algorithms that produced stacked sequences of the same quality as Helicon Focus or Zerene Stacker.
- hugin and enfuse, two open-source tools made for HDR and panorama image processing, did work very well in the end. I am using
align_image_stackfrom hugin for aligning image stacks (no surprise, here) and enfuse to combine the in-focus regions. The results are not as robust when input data is bad, but I can easily use a shell script for batch processing and save a lot of work processing dozens of image stacks.
Excerpts from my shell script:
Align images:
$APPDIR/align_image_stack -v -m -a aligned $1/*.jpg
Combine aligned images:
$APPDIR/enfuse --exposure-weight=0 --saturation-weight=0 --contrast-weight=1 --hard-mask --contrast-window-size=9 --output=$OUTPUT_PATH/$2$DIR_NAME.jpg $TMP/*.tif
APPDIR is on my mac APPDIR=/Applications/Hugin/tools_mac when hugin is installed via the official installer.
That’s certainly not the most convenient workflow for people who would rather use a graphical user interface, but for me that’s perfect. When I do a dozen polishing steps and want to have a focus-stacked image in between each one, I don’t want to manually copy images, click on five buttons in the user interface and assign a name to the resulting image. I can write a script for that once and don’t need to worry later. The only truly manual step: While the Zerene Stacker and Helicon Focus seem to manage that fine, enfuse is a bit susceptible to images in the stack that are completely out of focus. If you have a bit of overshoot in your image stack, ie. move the camera beyond the object and there is no part in the image that is in focus, you may need to delete these manually. If you don’t do that, aligning and stacking might fail.
Results
Aligning and stacking a sequence of 24 images:
The result looks quite usable:
