Reverse Perspective Portraits
01 Jun 2023Photographers go crazy about a lot of technical things when it comes to photos. For example, the right focal length to shoot portraits and the best maximum aperture for the shallowest depth of field. A while ago even something like Bokeh was the thing. But why does focal length matter in the first place? Our brain is extremely sensitive to very small changes in facial features. But cameras distort faces and warp the perspective1.
But could we remove the perspective or even reverse it?
And how would portraits with a reversed perspective look like?
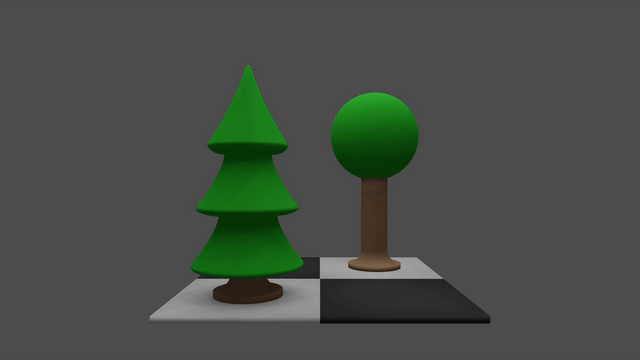
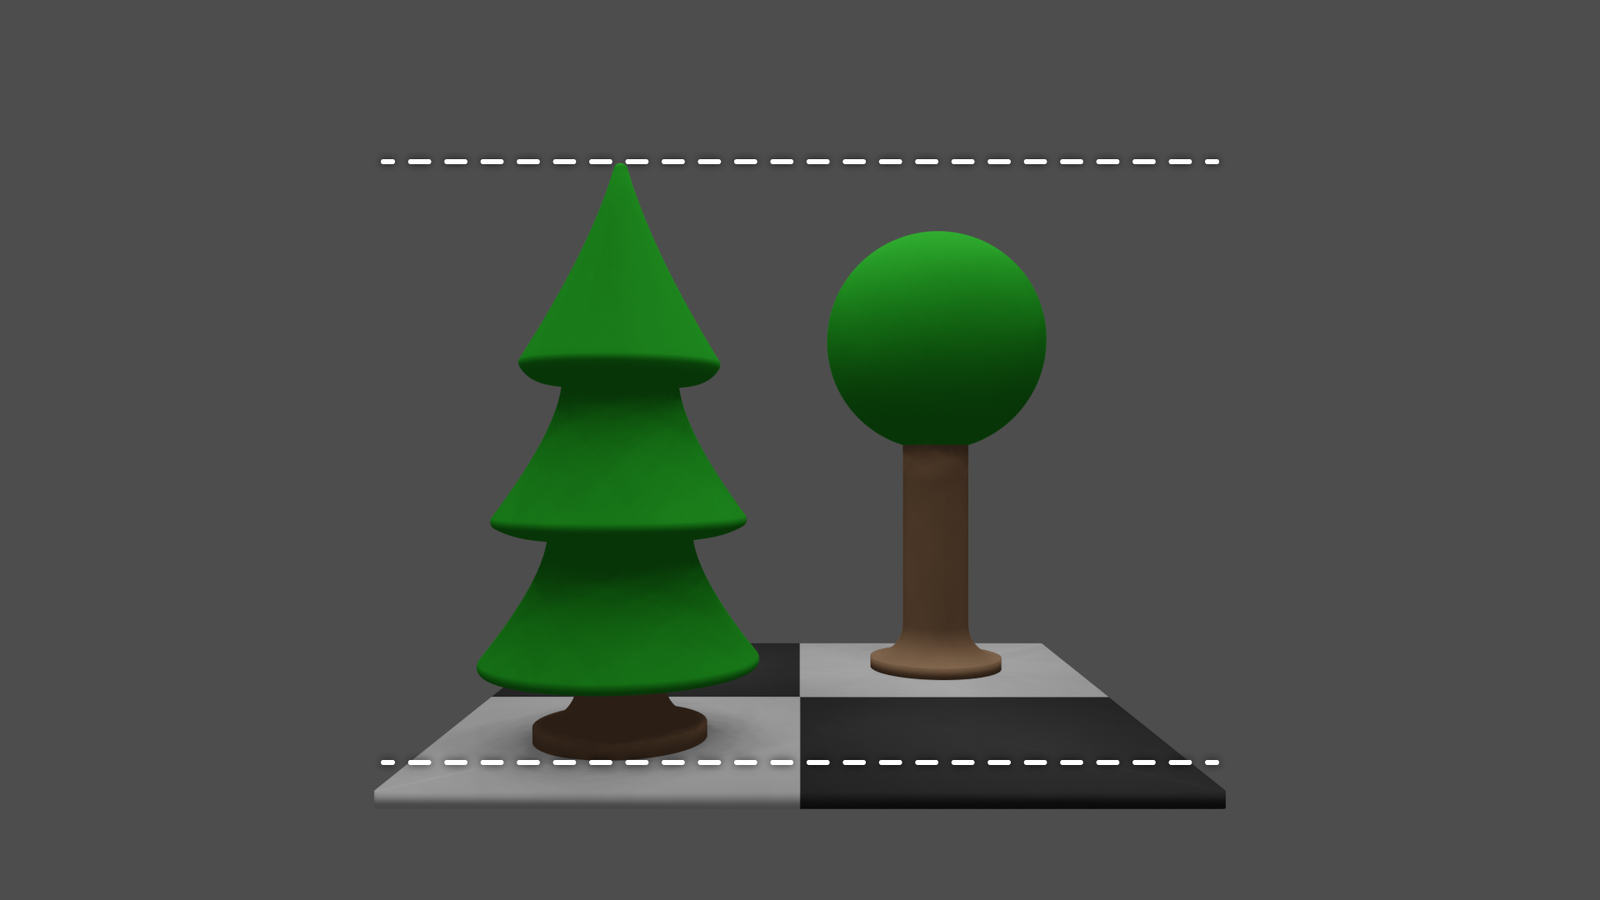
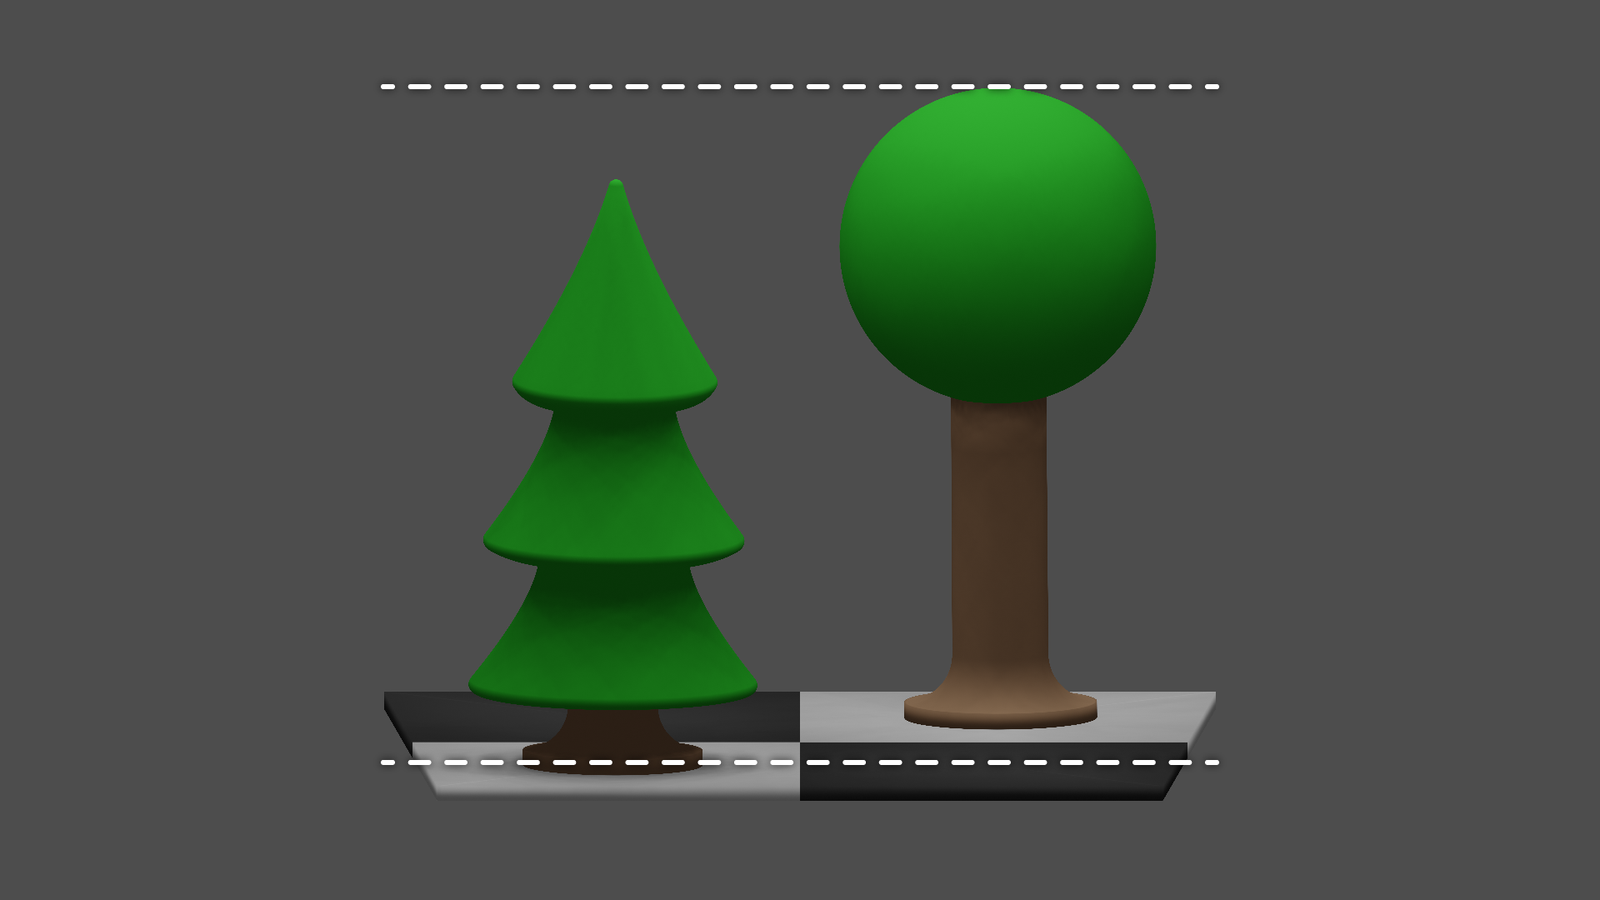
For illustrative purposes I made a 3d-model, that’s making it slightly easier to show things and talk a bit about theory. Imagine we’ve got a camera and two objects of the same height but at different distances:

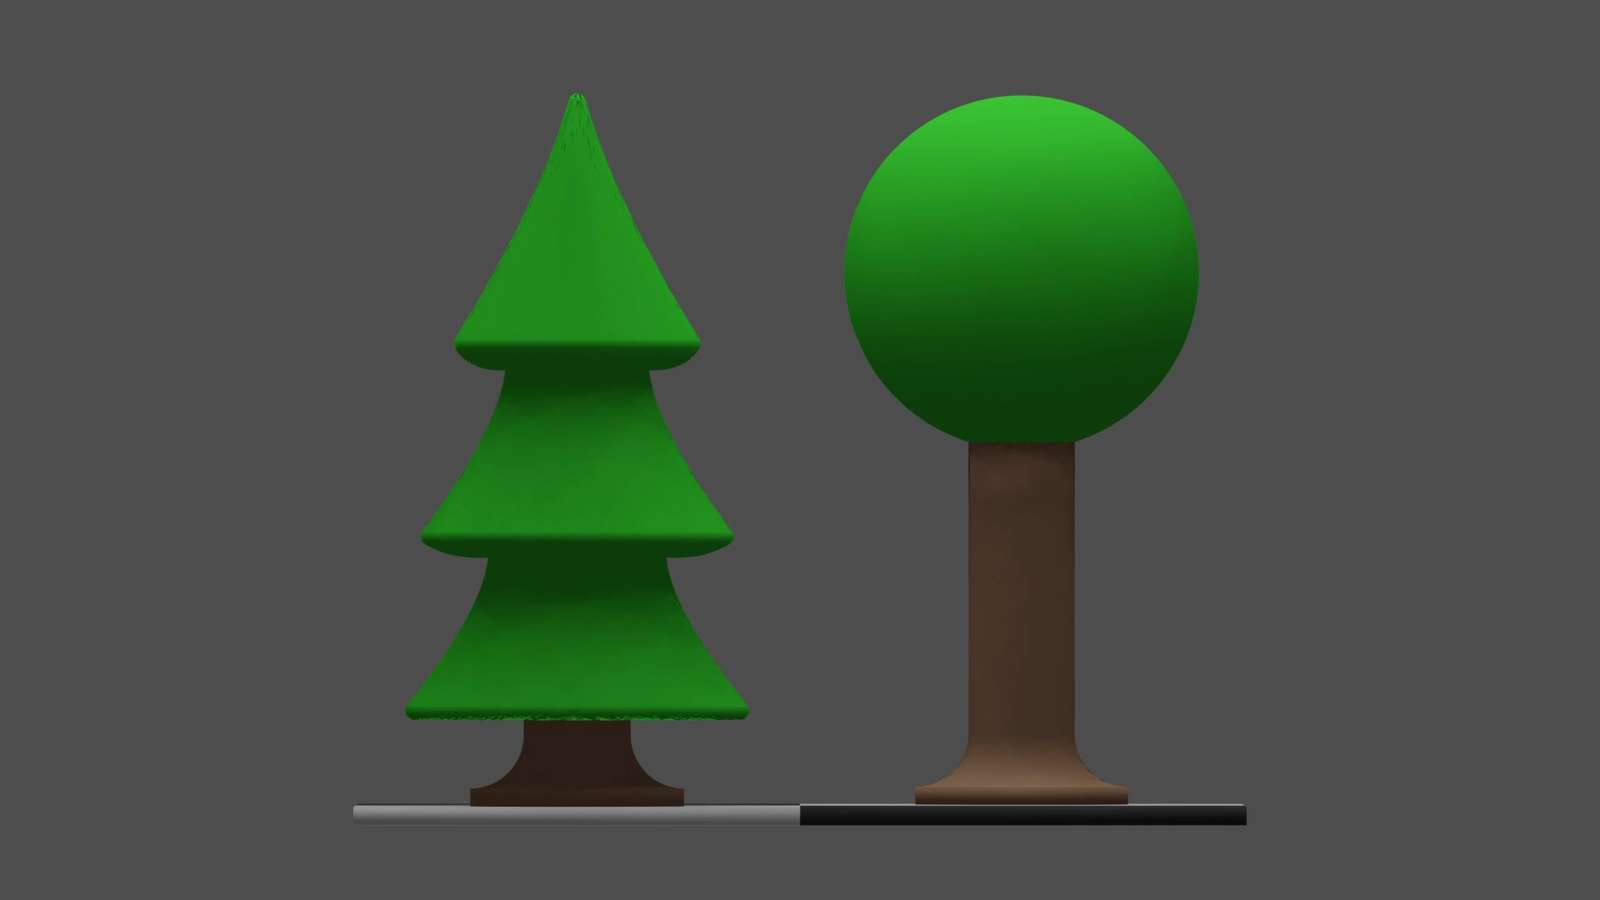
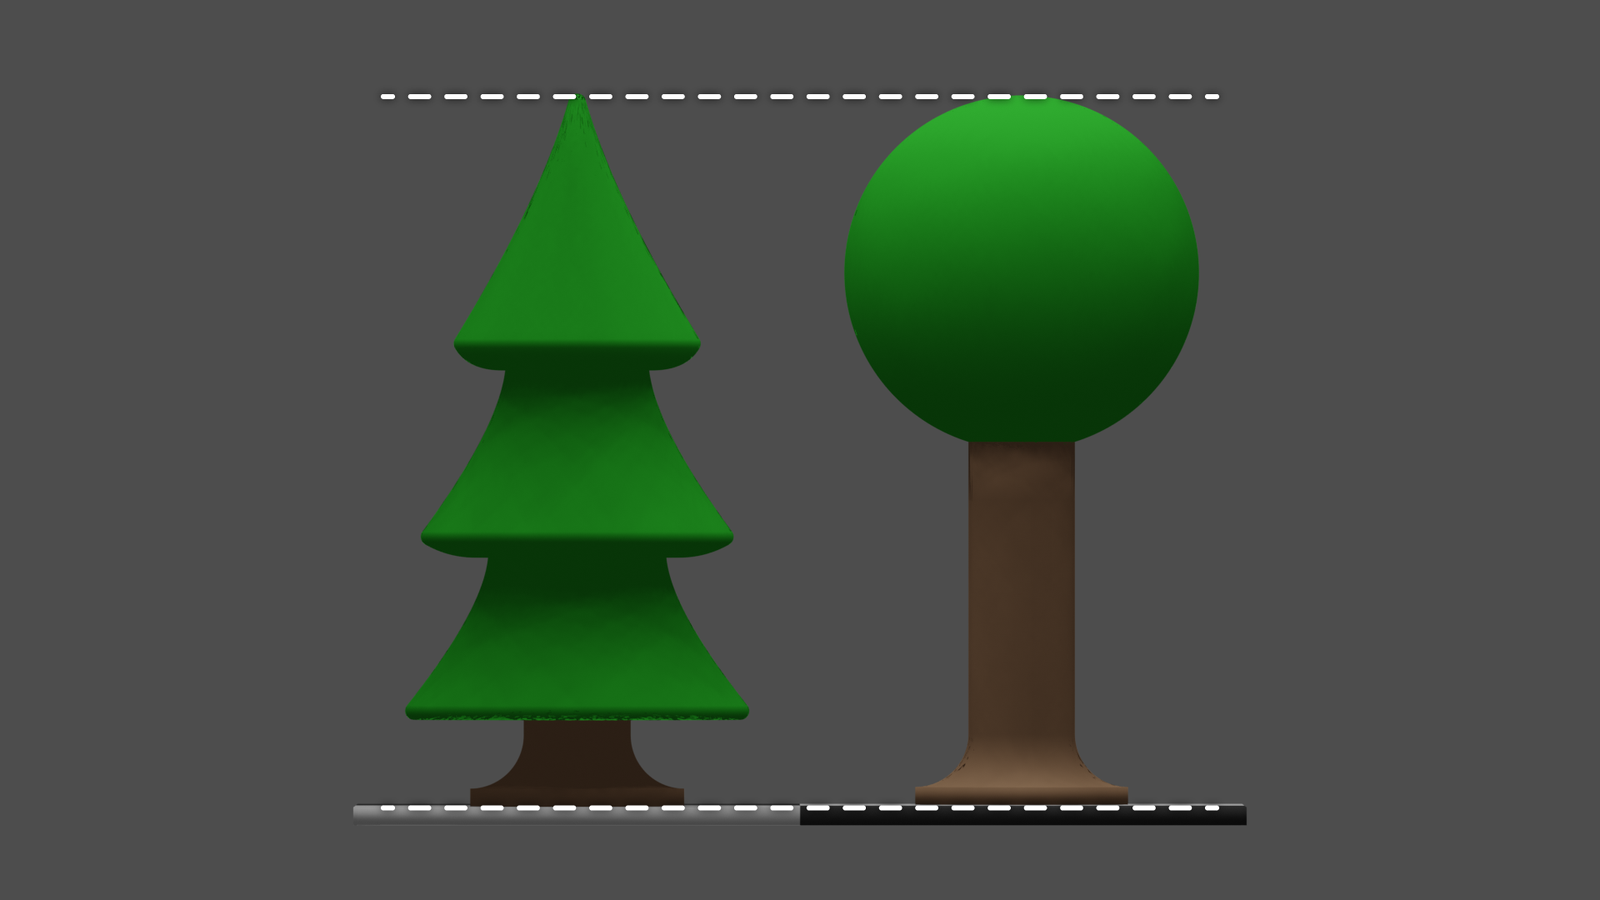
So, can we remove the perspective? Let’s increase the focal length while increasing the distance from the subject at the same time:
If the focal length gets close to infinity, the perspective distortion is gone and we end up with something that looks like an orthogonal projection. If you have used a 3d-modeling application before you probably have already seen that. If you move the camera away while increasing the focal length to keep the same frame of view, you get a funky visual effect (called a dolly zoom).
Entocentric, Telecentric and Hypercentric Lenses
But would that work with a “real camera”? Sure, but let’s look at a very basic optical system first:
The human eye is using a single lens to focus light on the retina. In front of the eye is the iris, similar to the aperture in a camera lens. The iris lets some light rays pass and blocks others.
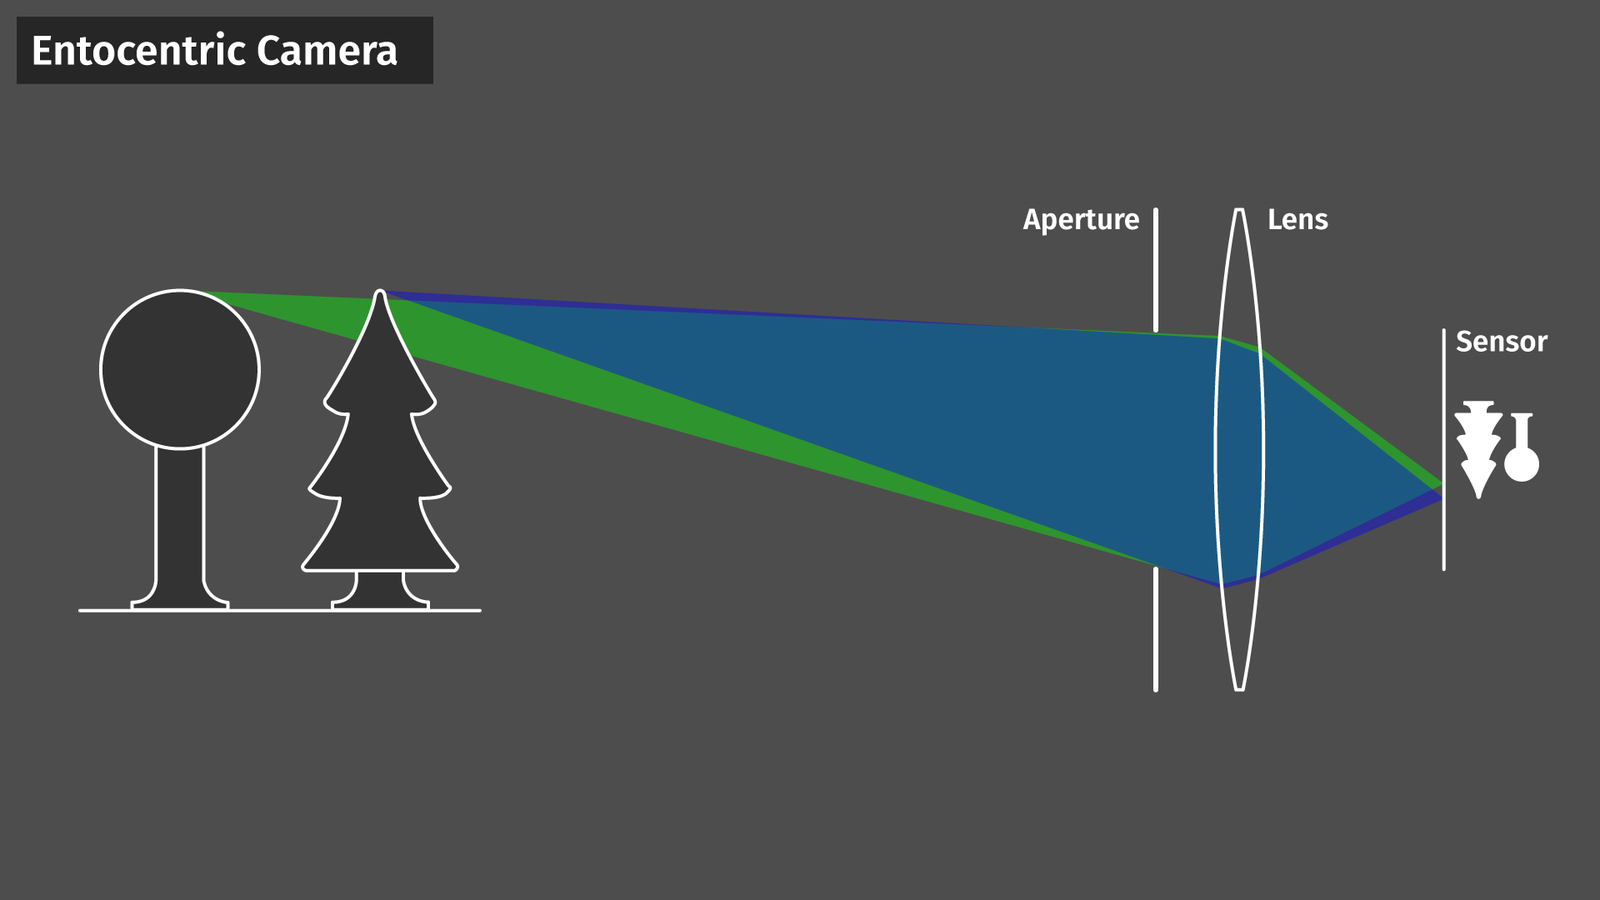
If objects are farther away, the light gets focused onto a smaller space on the retina or camera sensor.
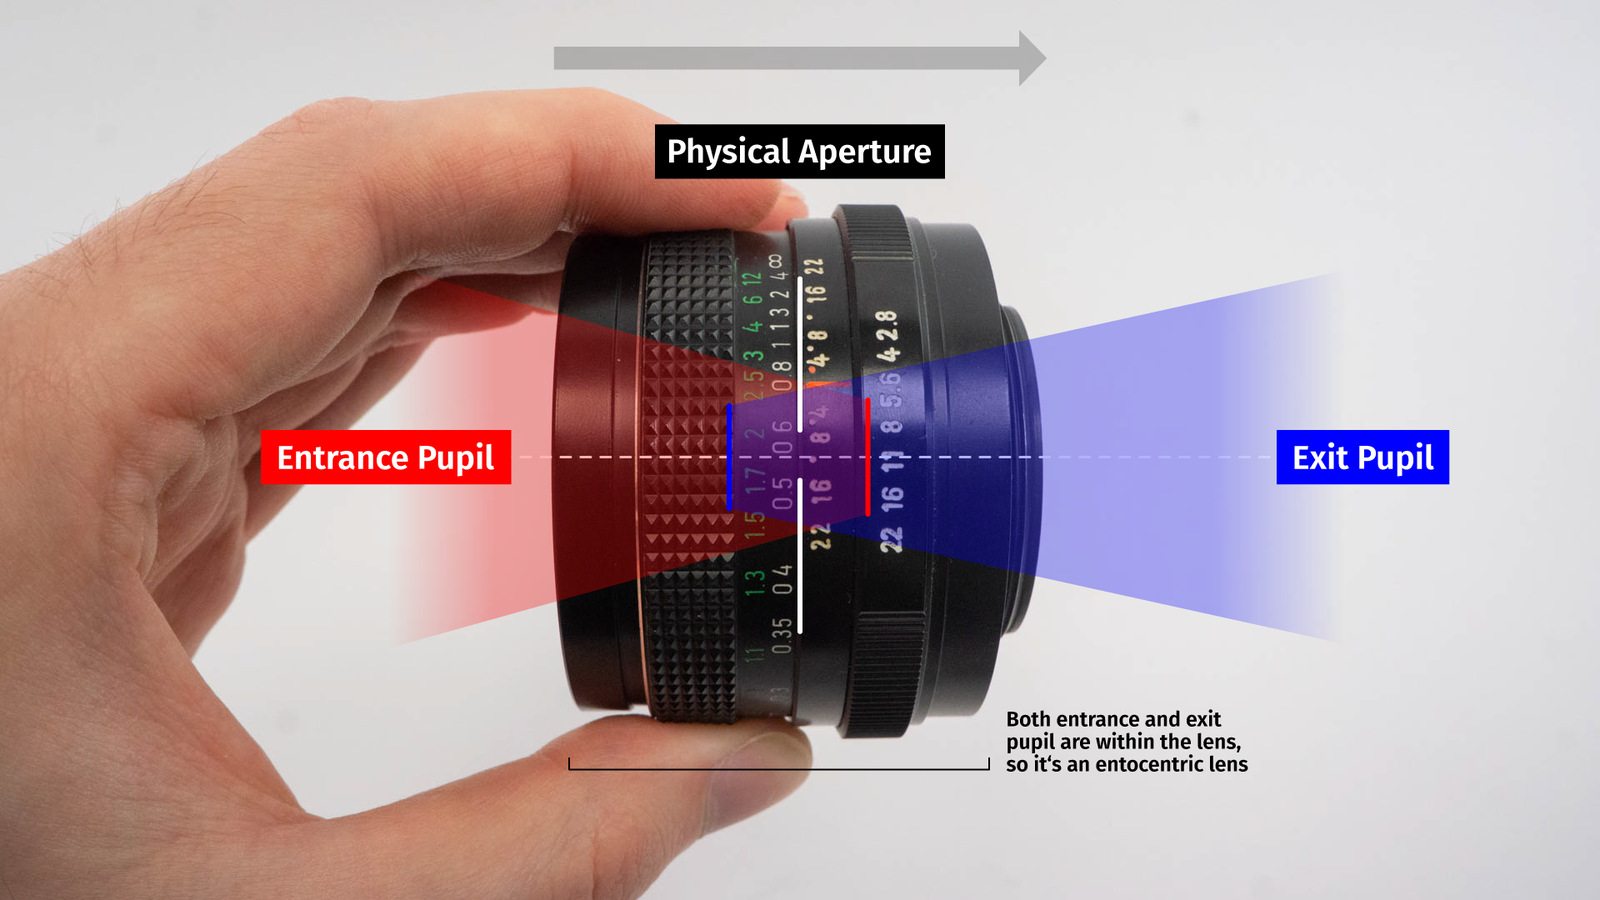
Technically, that’s called an entocentric camera and we seldom even think about this type of perspective effect because that’s how our eye works and basically every lens you can buy for a standard camera.
But there are other types of lenses as well. If we add another lens and move the aperture to its focal point, the aperture allows only very specific rays to pass.
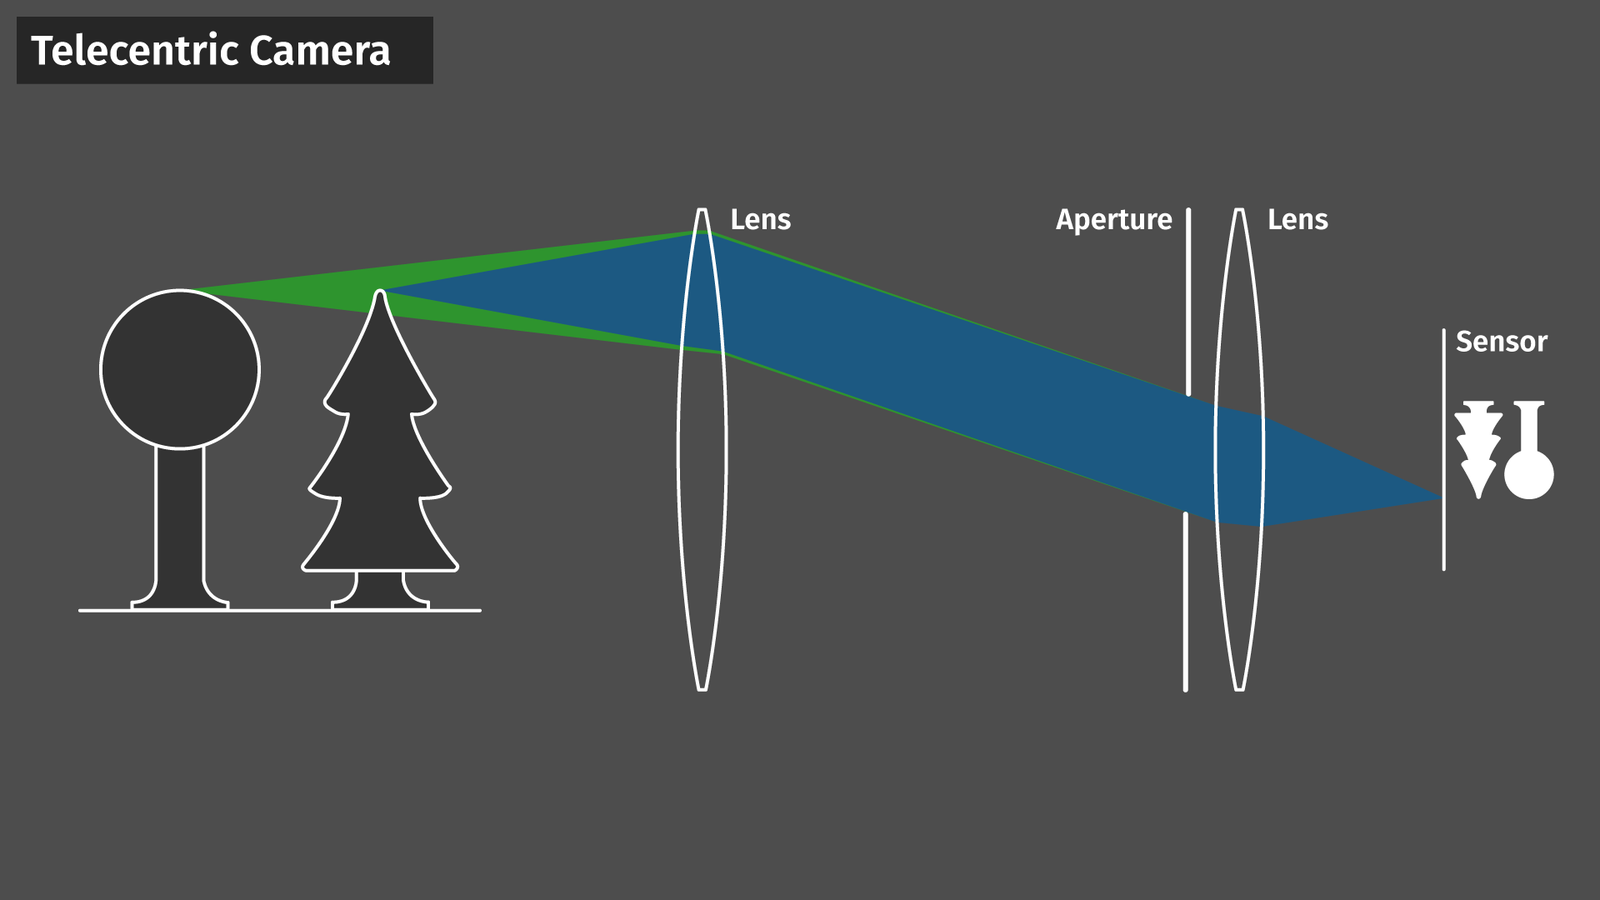
The result looks like an image from an infinite focal length lens.
Objects get depicted at the same size no matter how close they are to the camera. There is no perspective distortion anymore. That’s a telecentric lens and Edmund Optics has a nice video that shows how this looks in reality. These are usually sold for machine vision tasks, like measuring parts in a factory line.
As you might have guessed, the telecentric lens only sees objects smaller than itself. Why? Every lens has something that’s called the entrance pupil. That’s the narrowest point through which light can pass, usually the aperture. What’s slightly unintuitive is that the entrance pupil is not the physical aperture itself, but the size of the image of the aperture seen through the front of the lens.
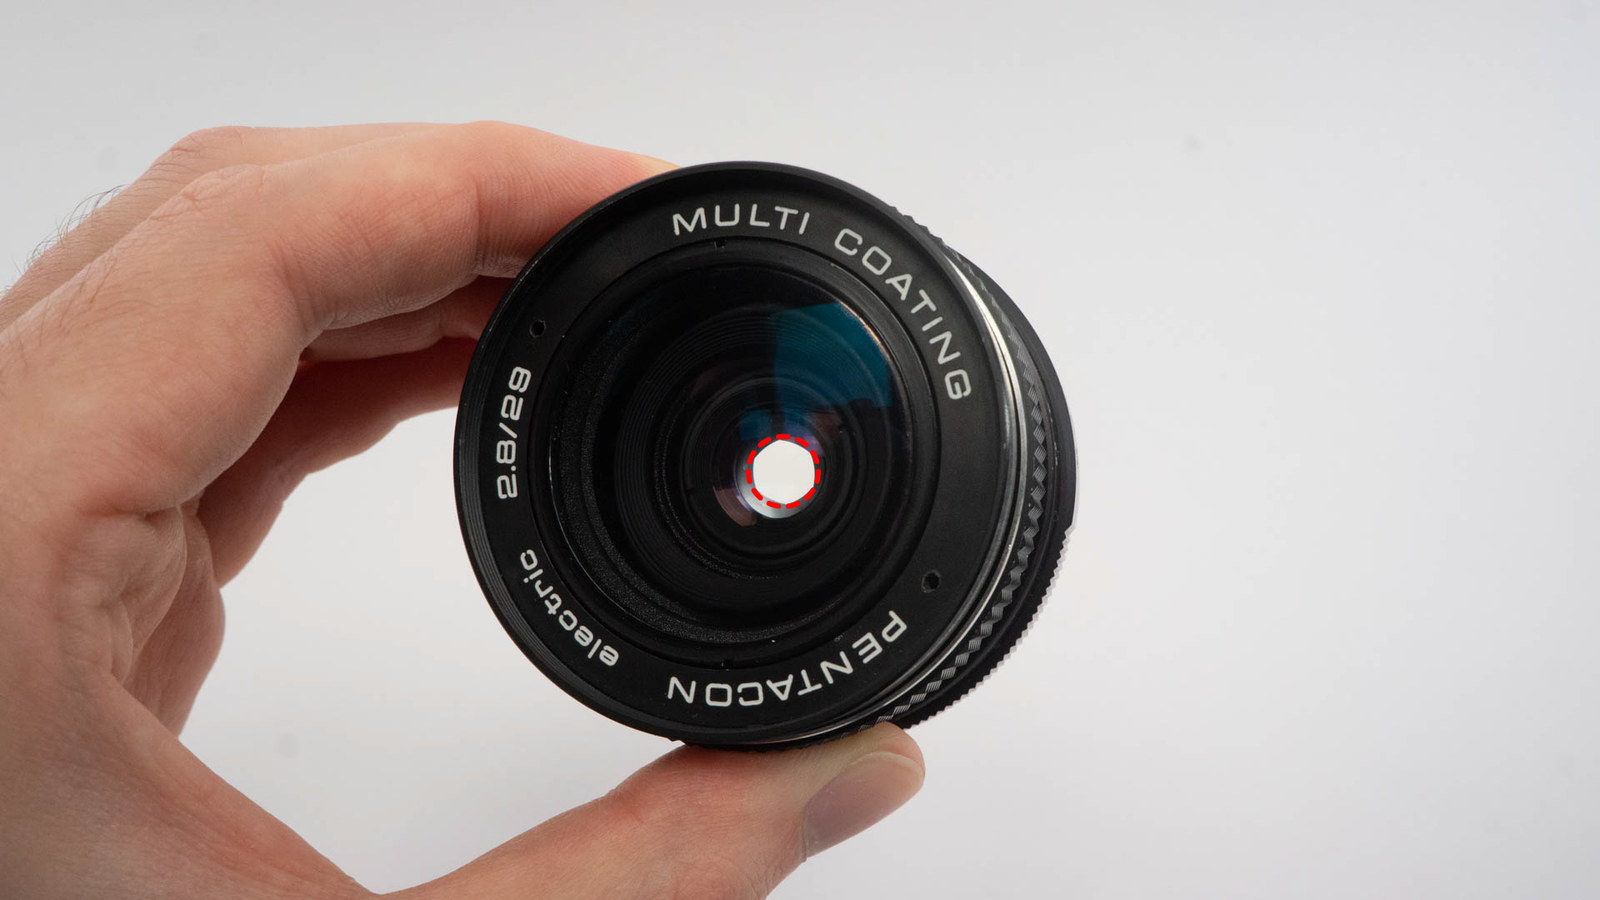
For the telecentric lens, this pupil is not located inside the lens but infinitely far away and almost as large as the lens itself.
So, finally, let’s get to what I promised earlier: reverse the perspective.
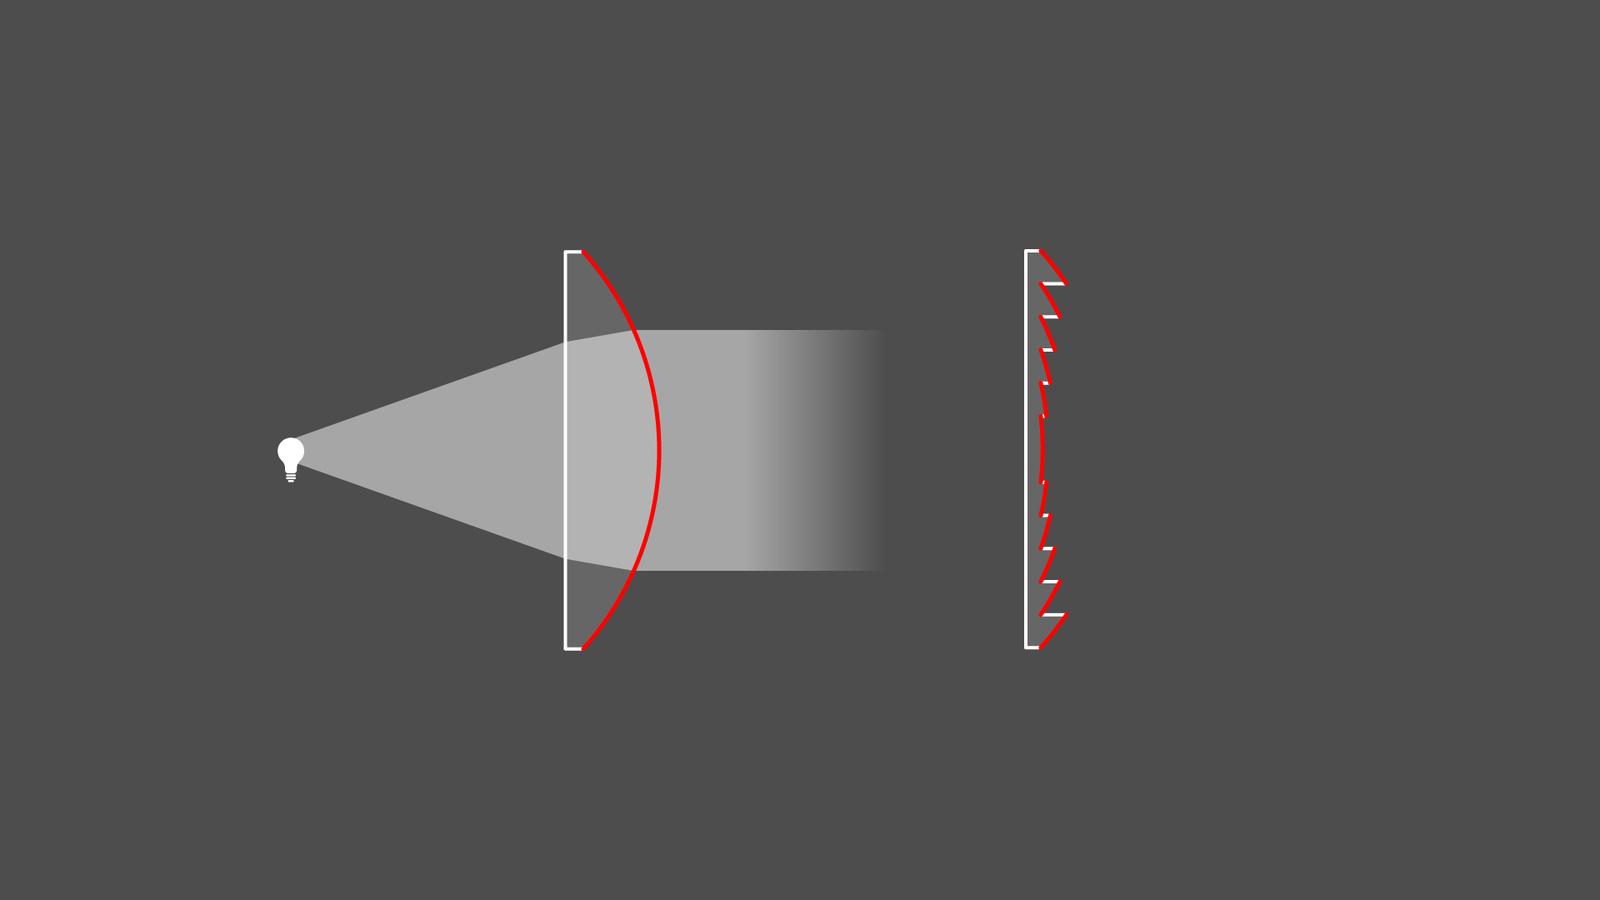
If we place the iris veeery close to the imaging plane and add a lens, the imaginary entrance pupil is located in front of the first glass element.
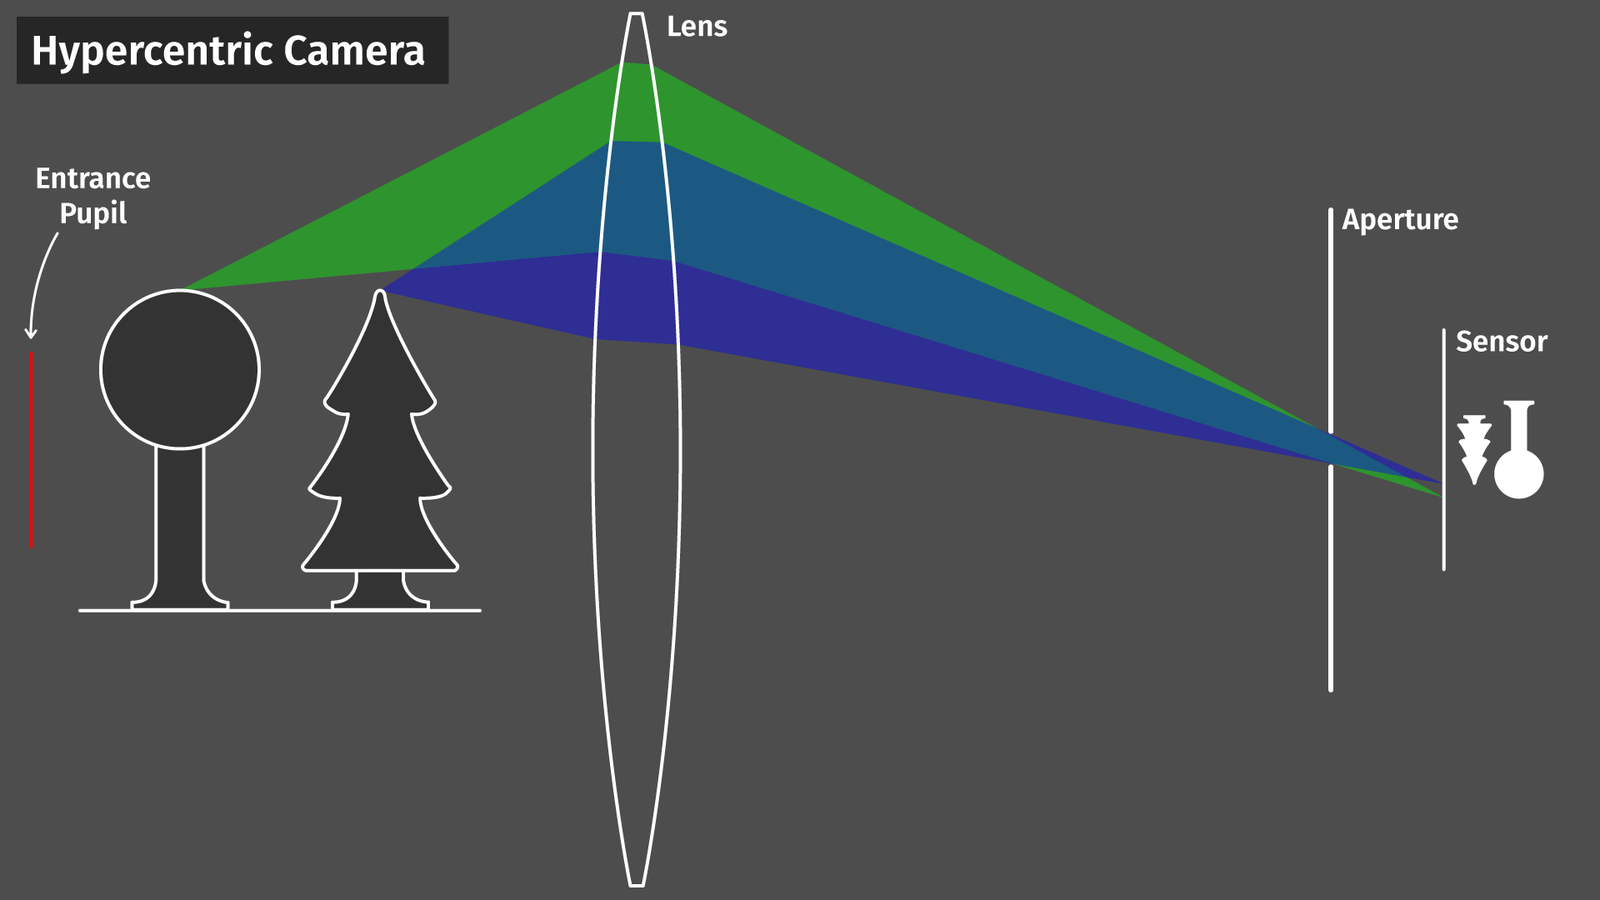
If we now place something in between the entrance pupil and the glass, the magic happens. The iris picks only the rays that depict the objects larger that are closer to the back because that’s where the entrance pupil is.
You can actually buy hypercentric lenses at Edmund Optics for a surprisingly low amount of money (about 3000 Euro) considering this is a highly specialized piece of optics that not a lot of people will purchase.
The most important part of a hypercentric lens is the diameter of the entrance pupil. So, our first lens must be larger than whatever we want to take an image of and if we want to take portraits, well, your lens is better be much bigger than a head.
So, of course, I had to test that.
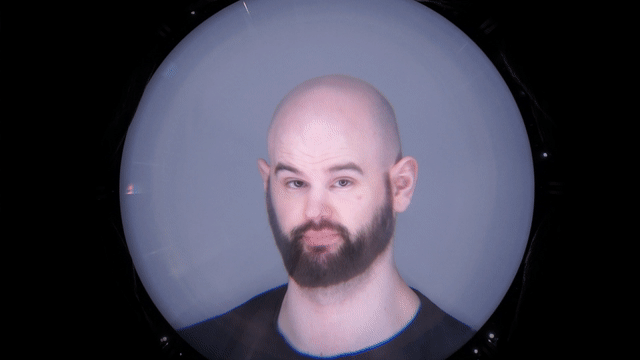
Example Portraits:
In case you are able to procure such a gigantic and slightly odd product, you can take these likewise odd portraits:
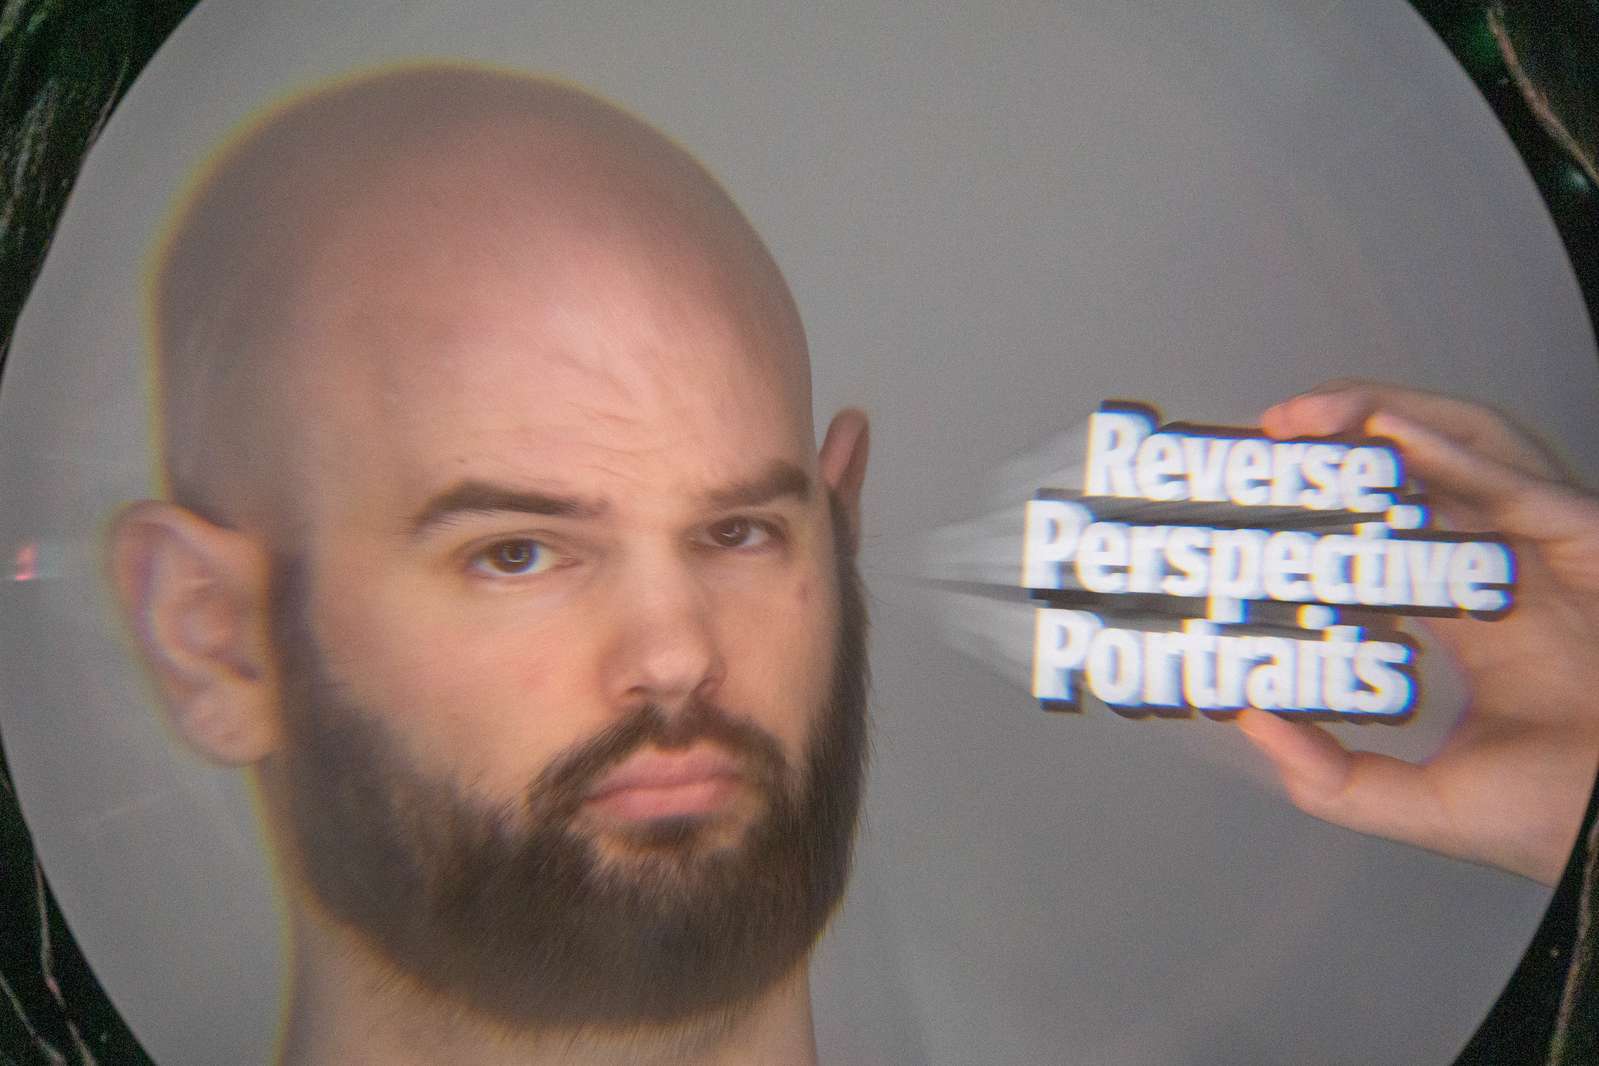
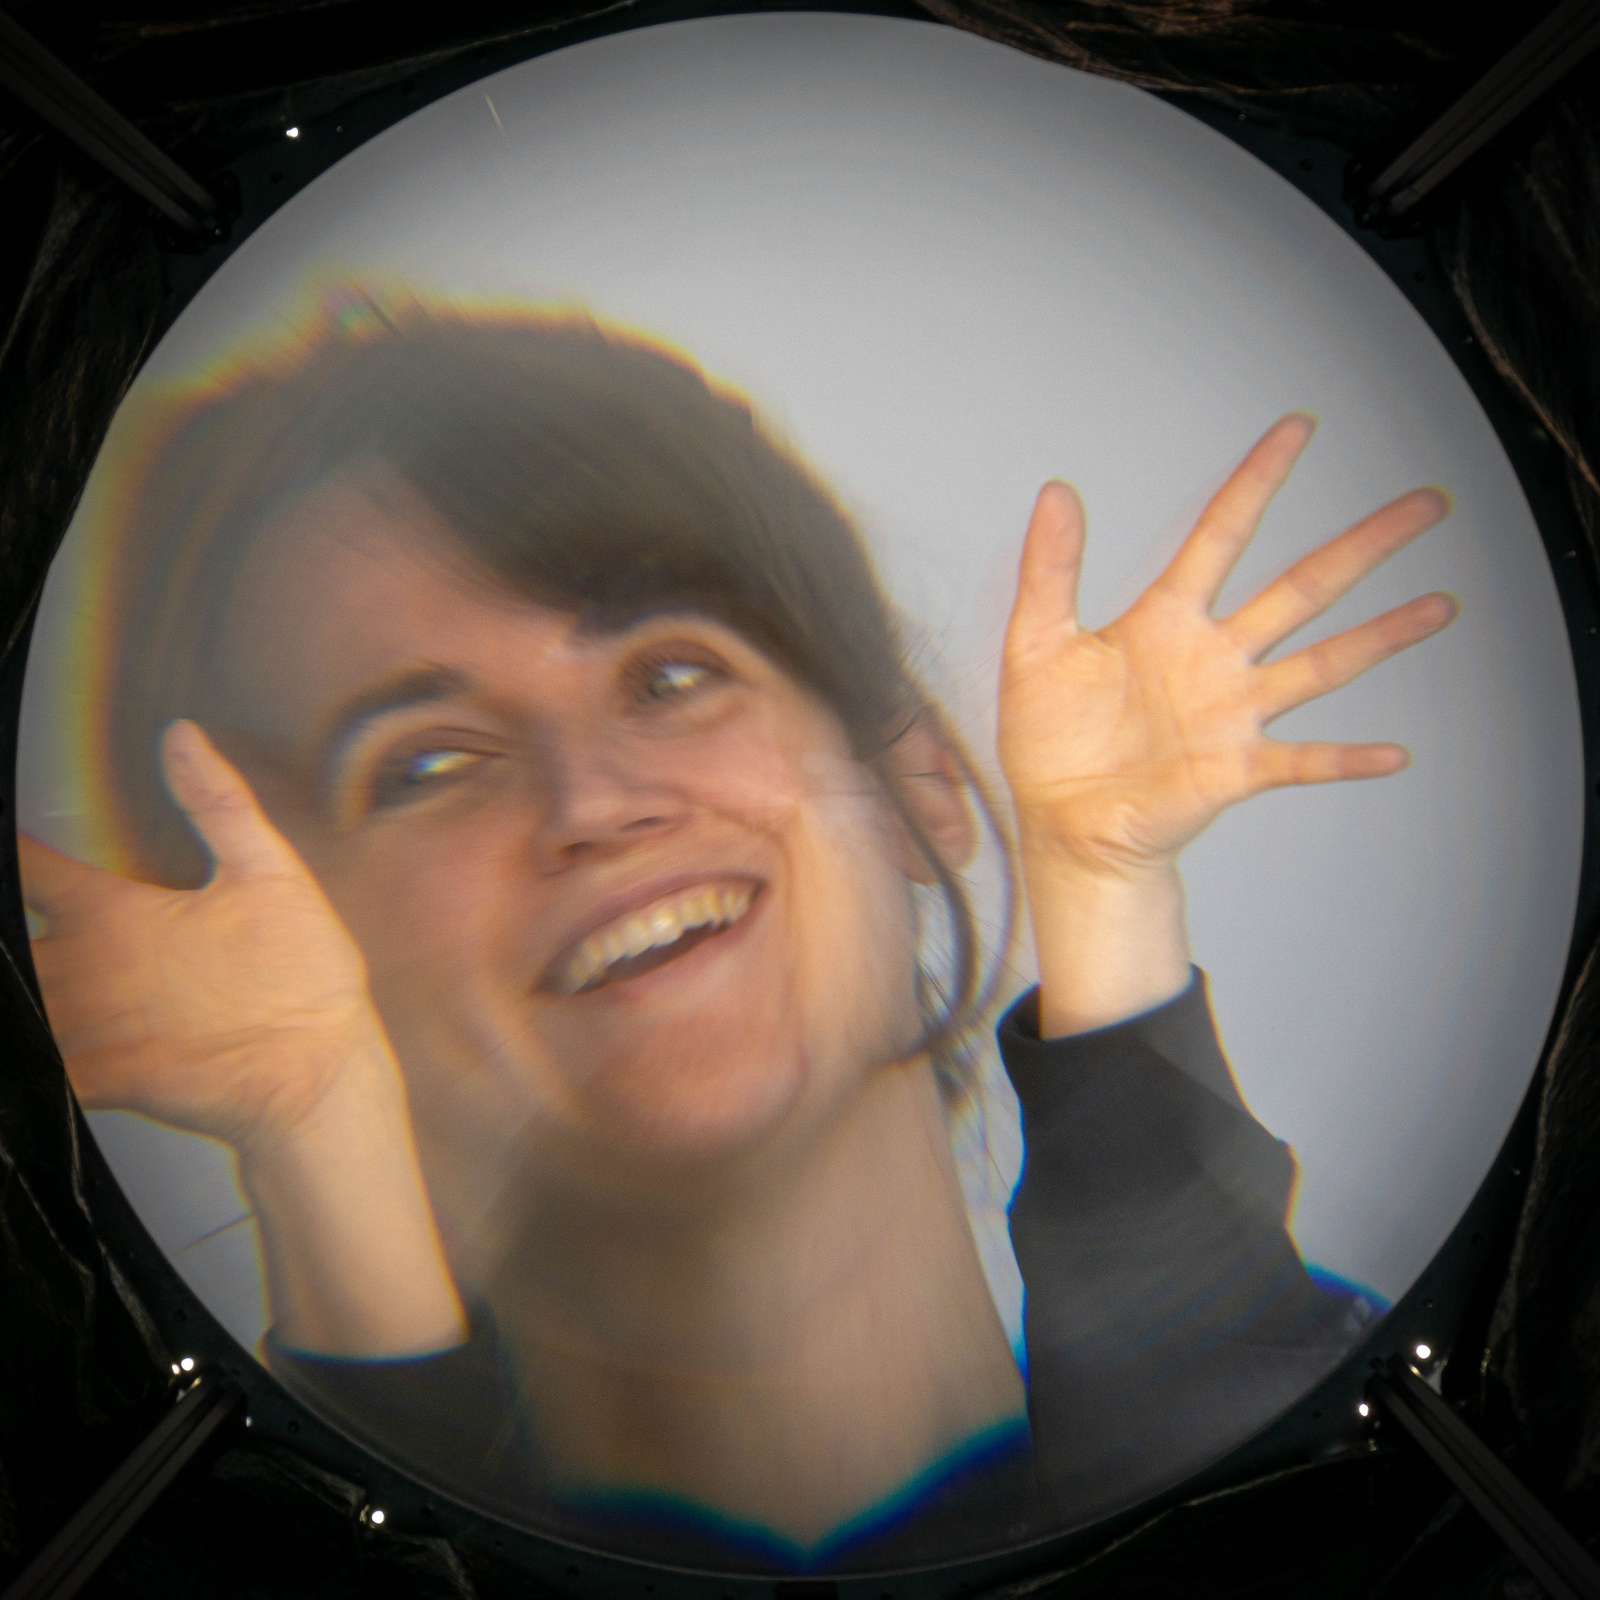
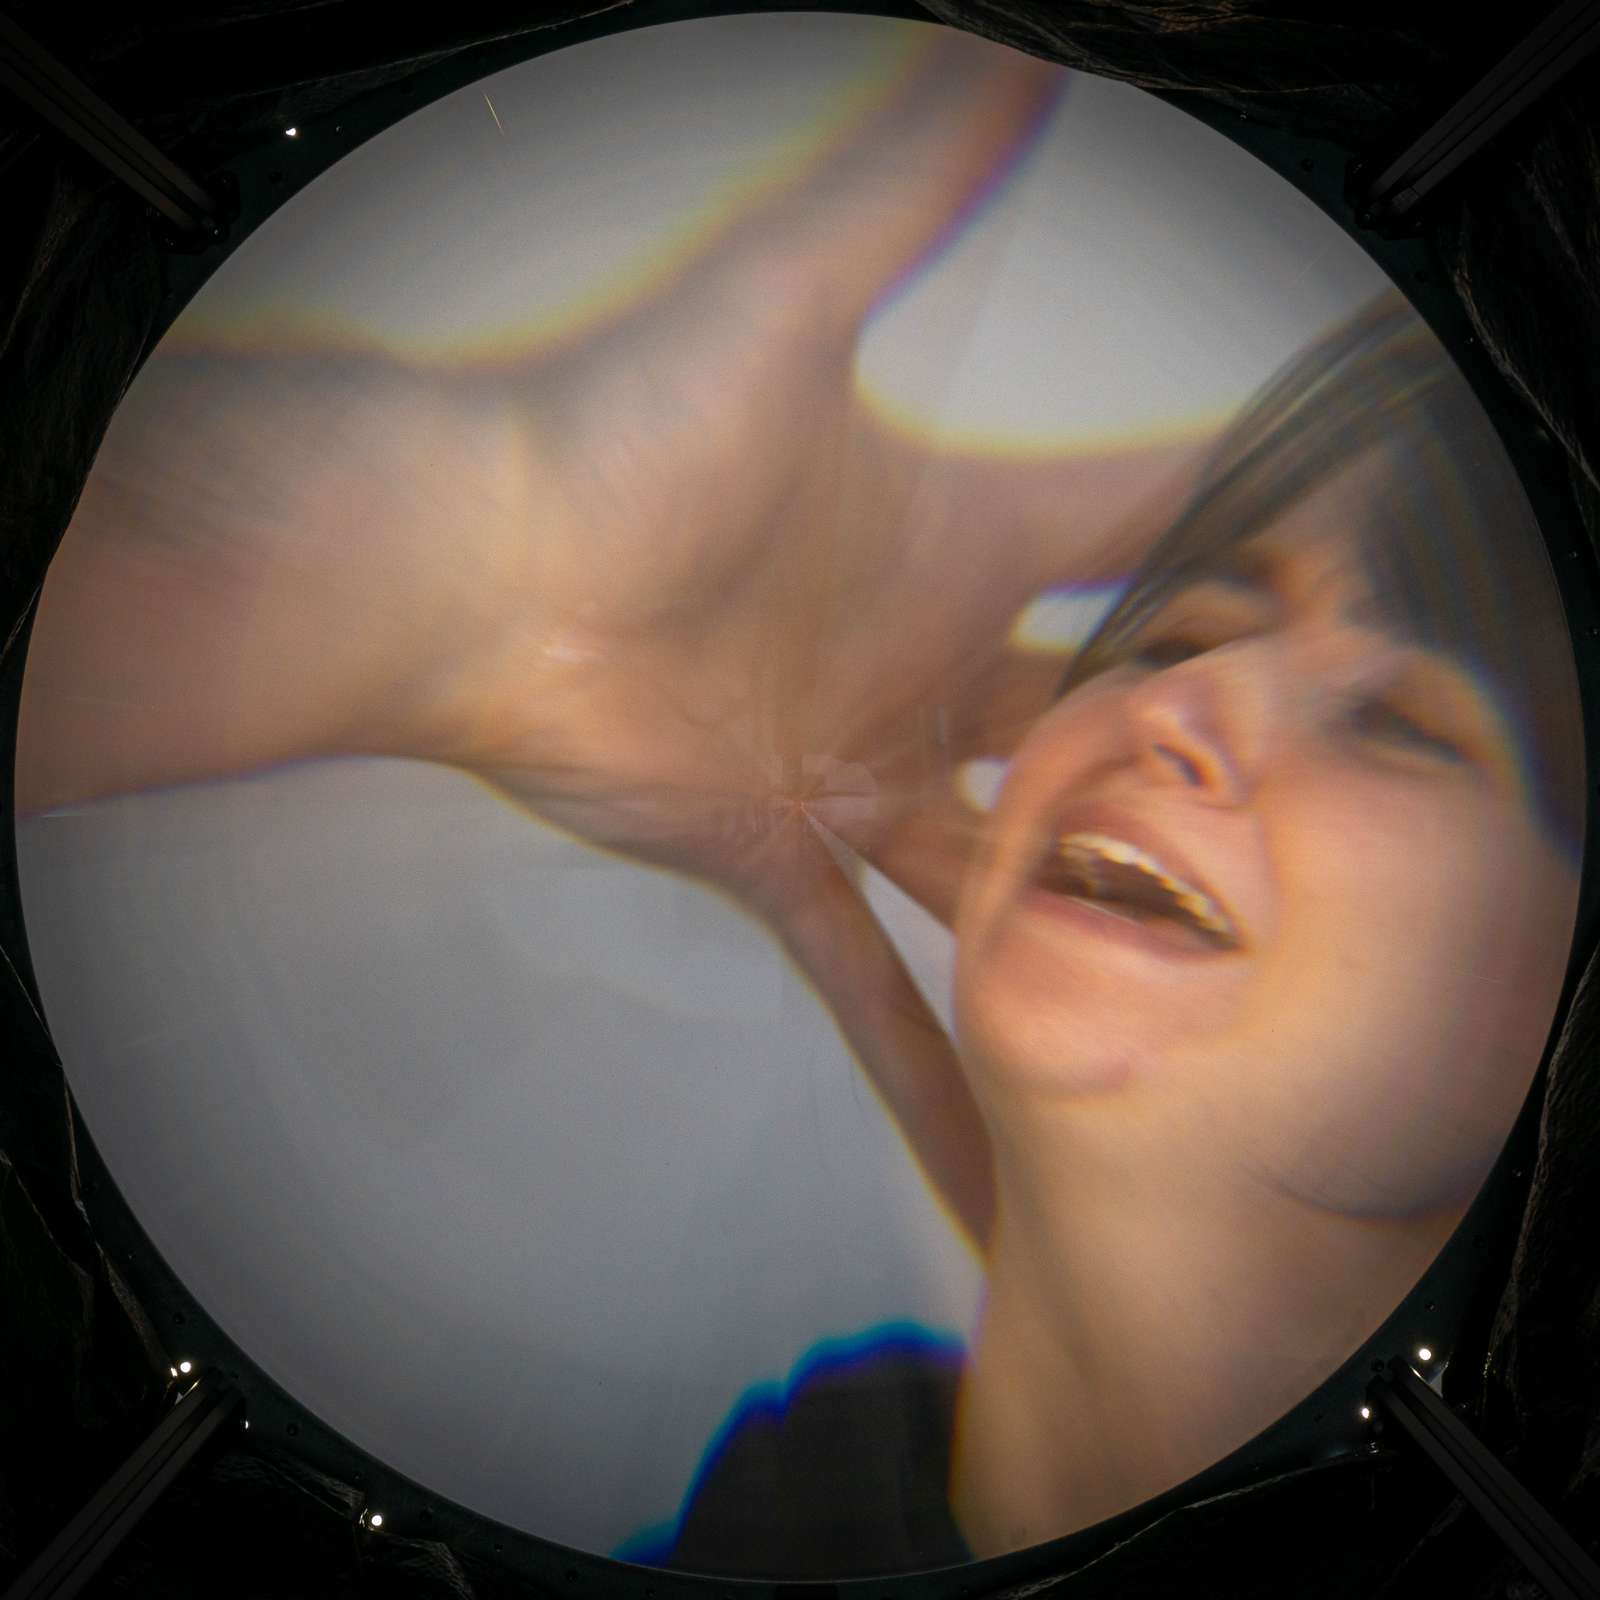
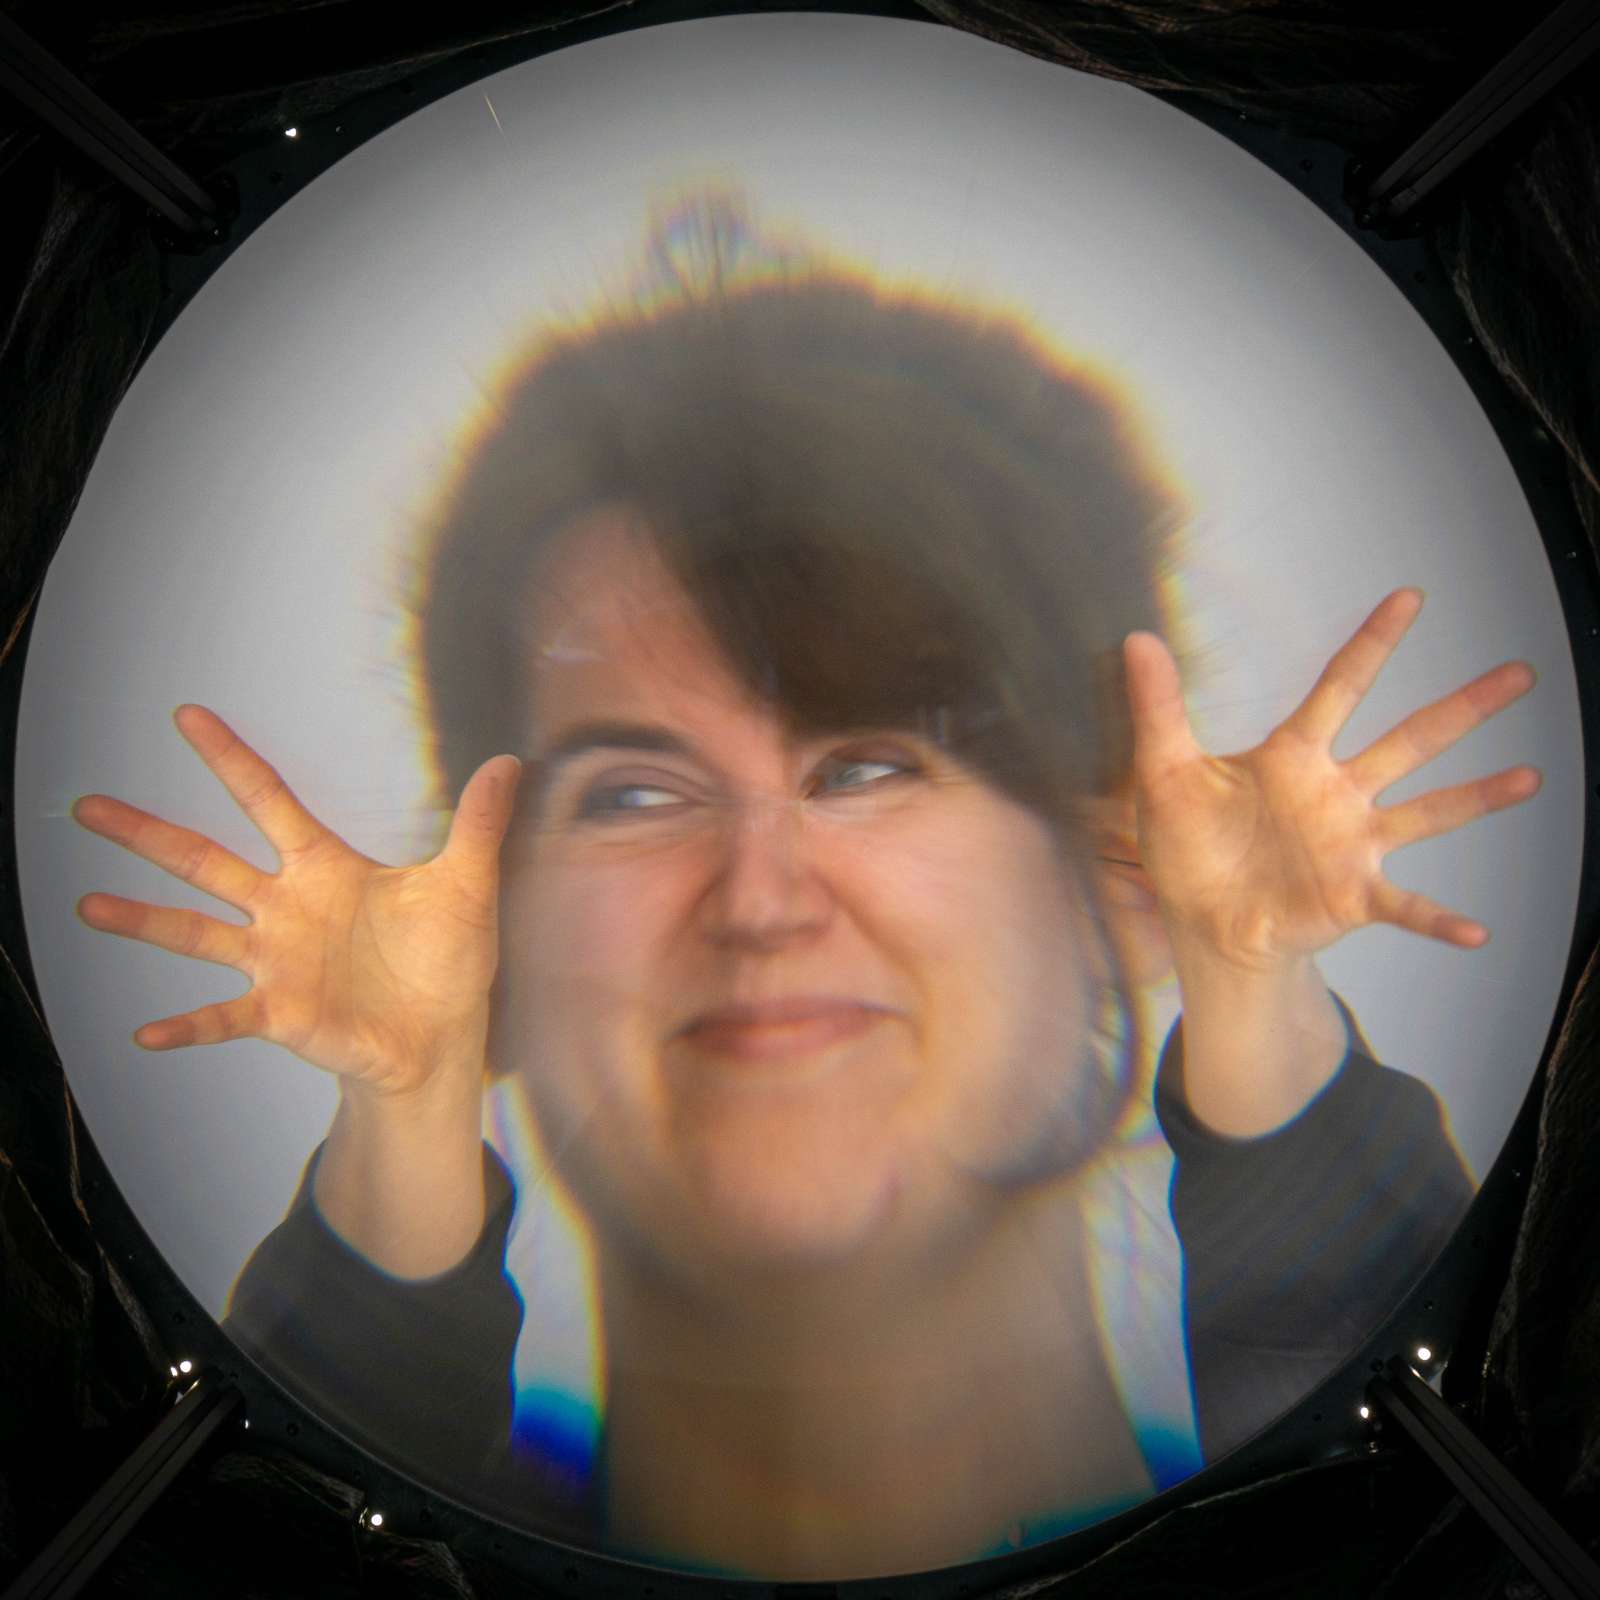
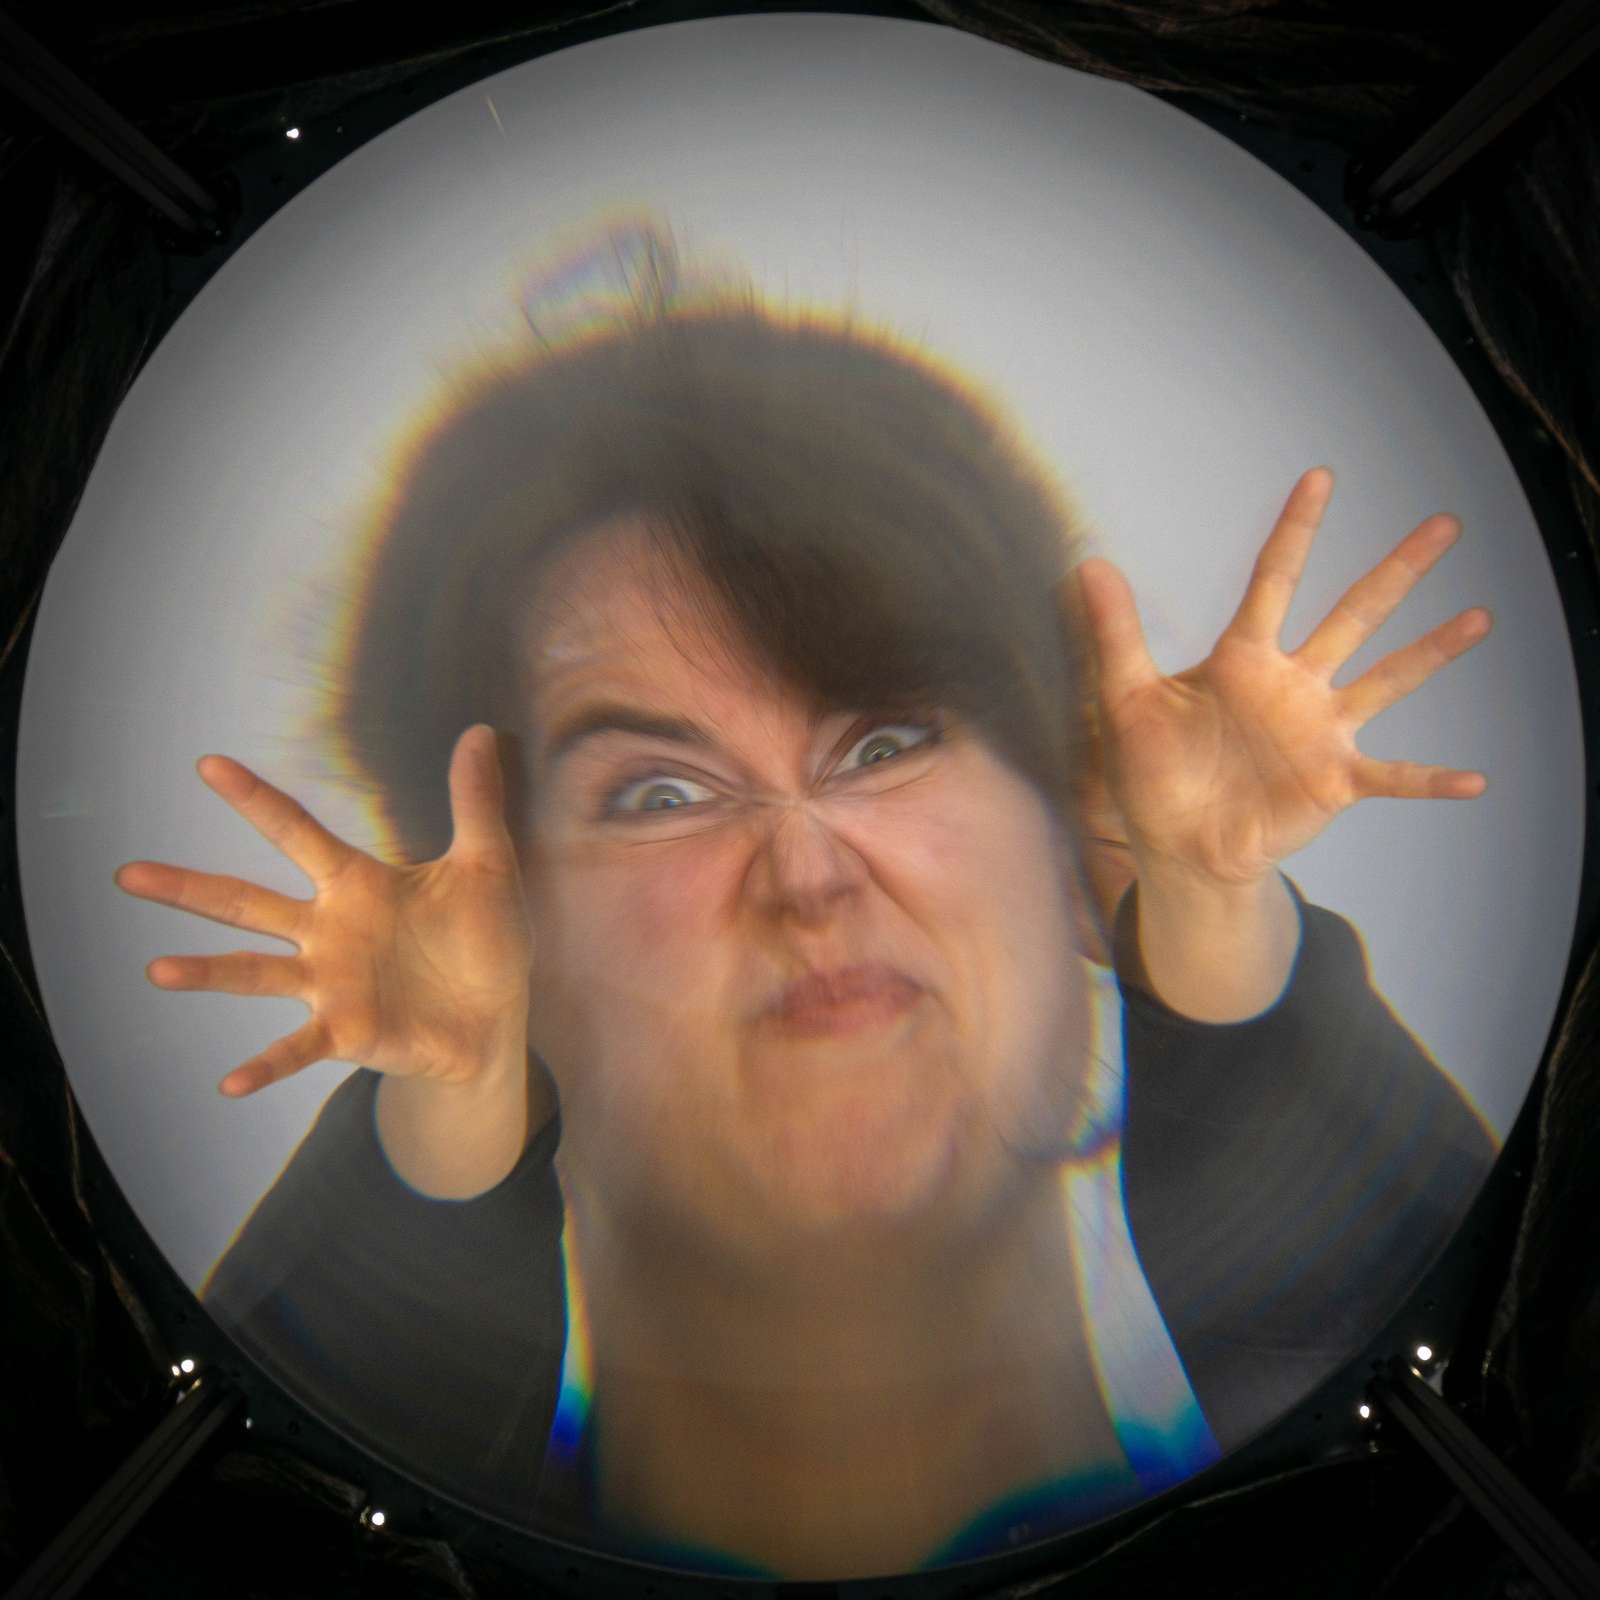
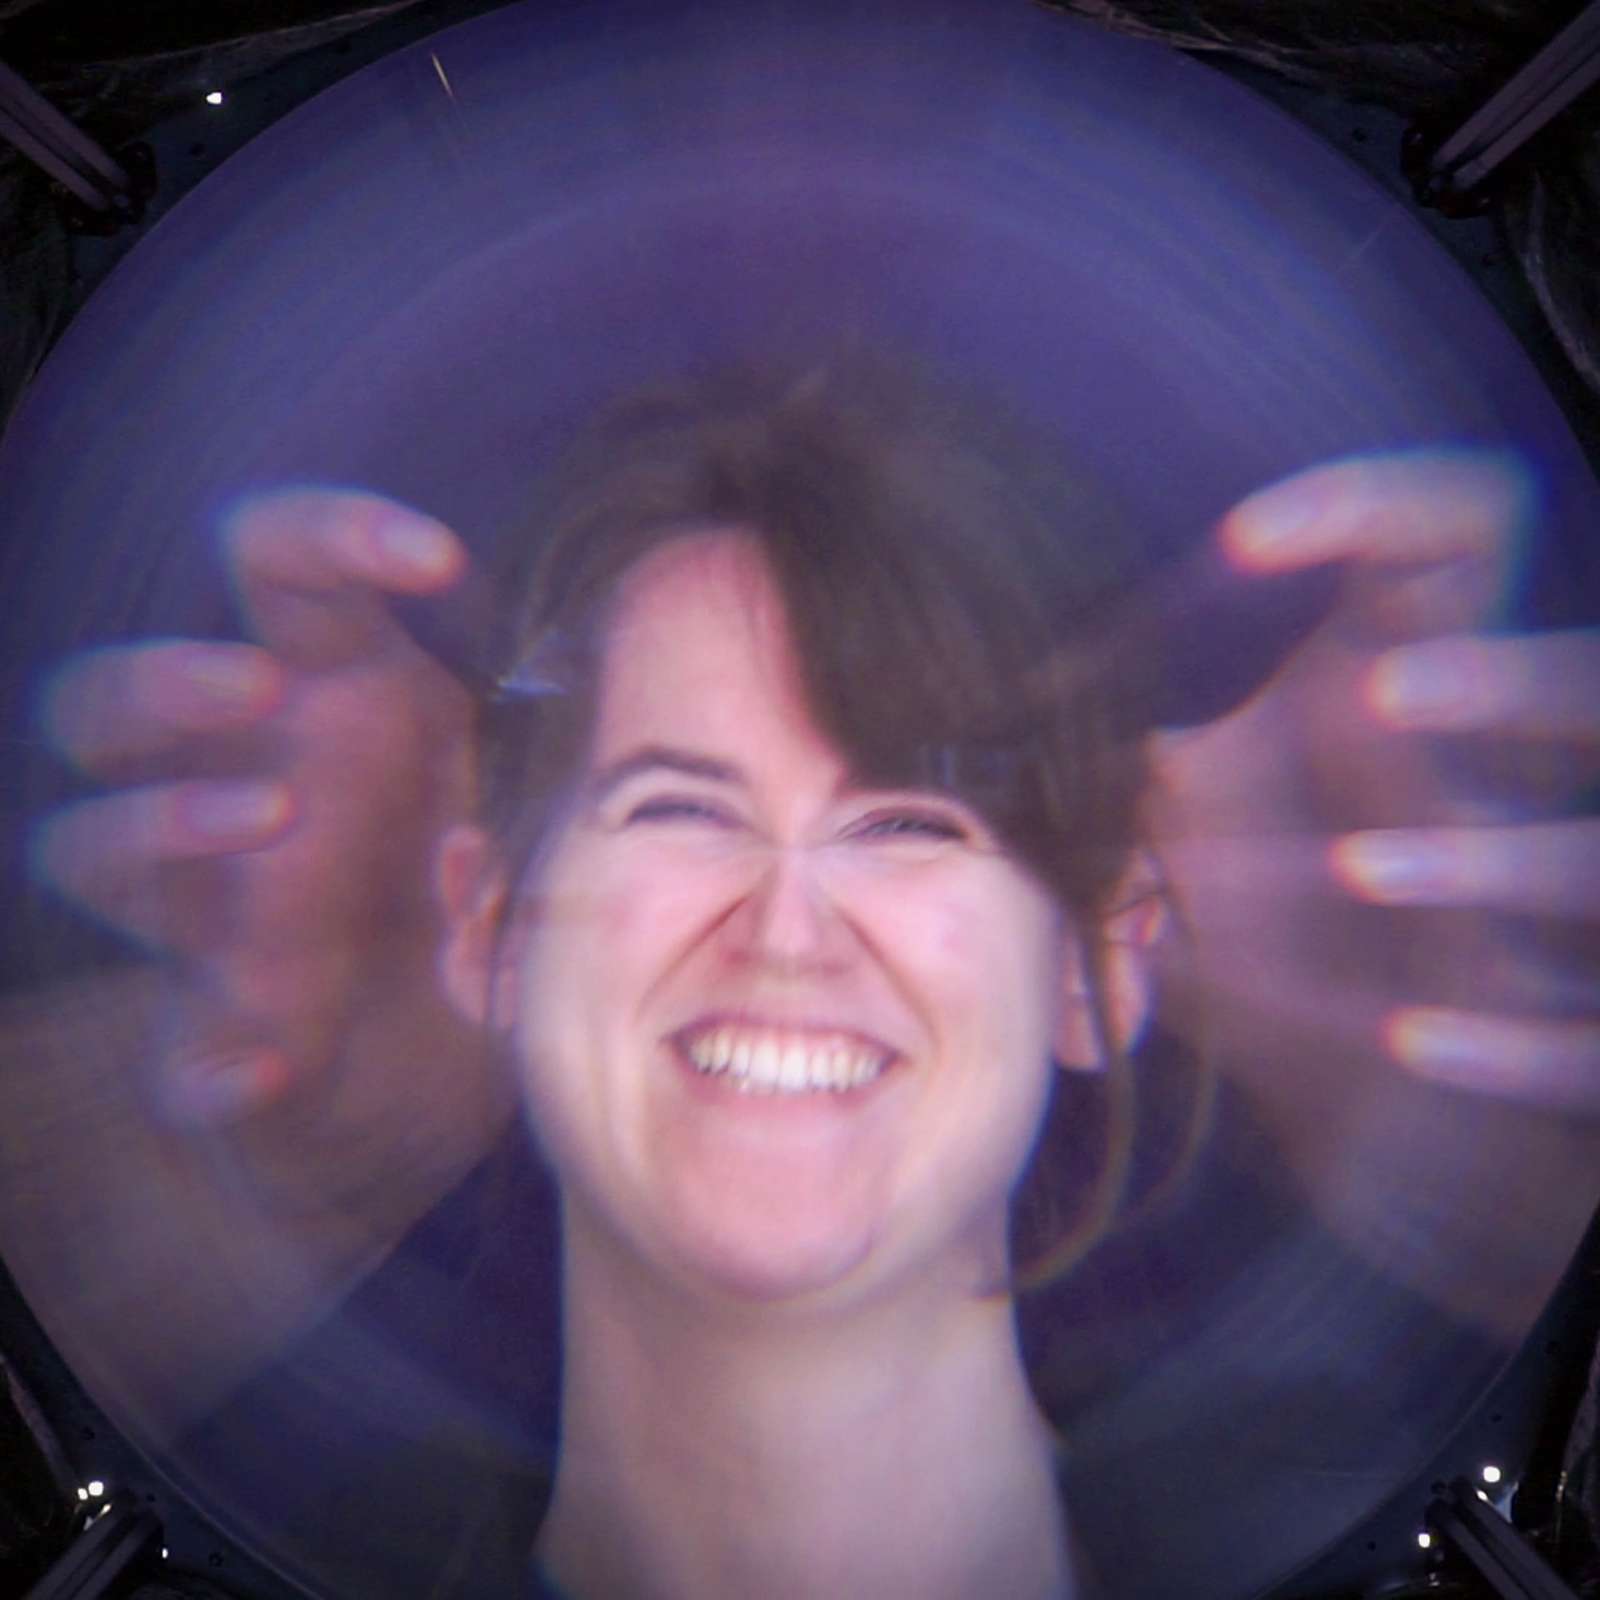

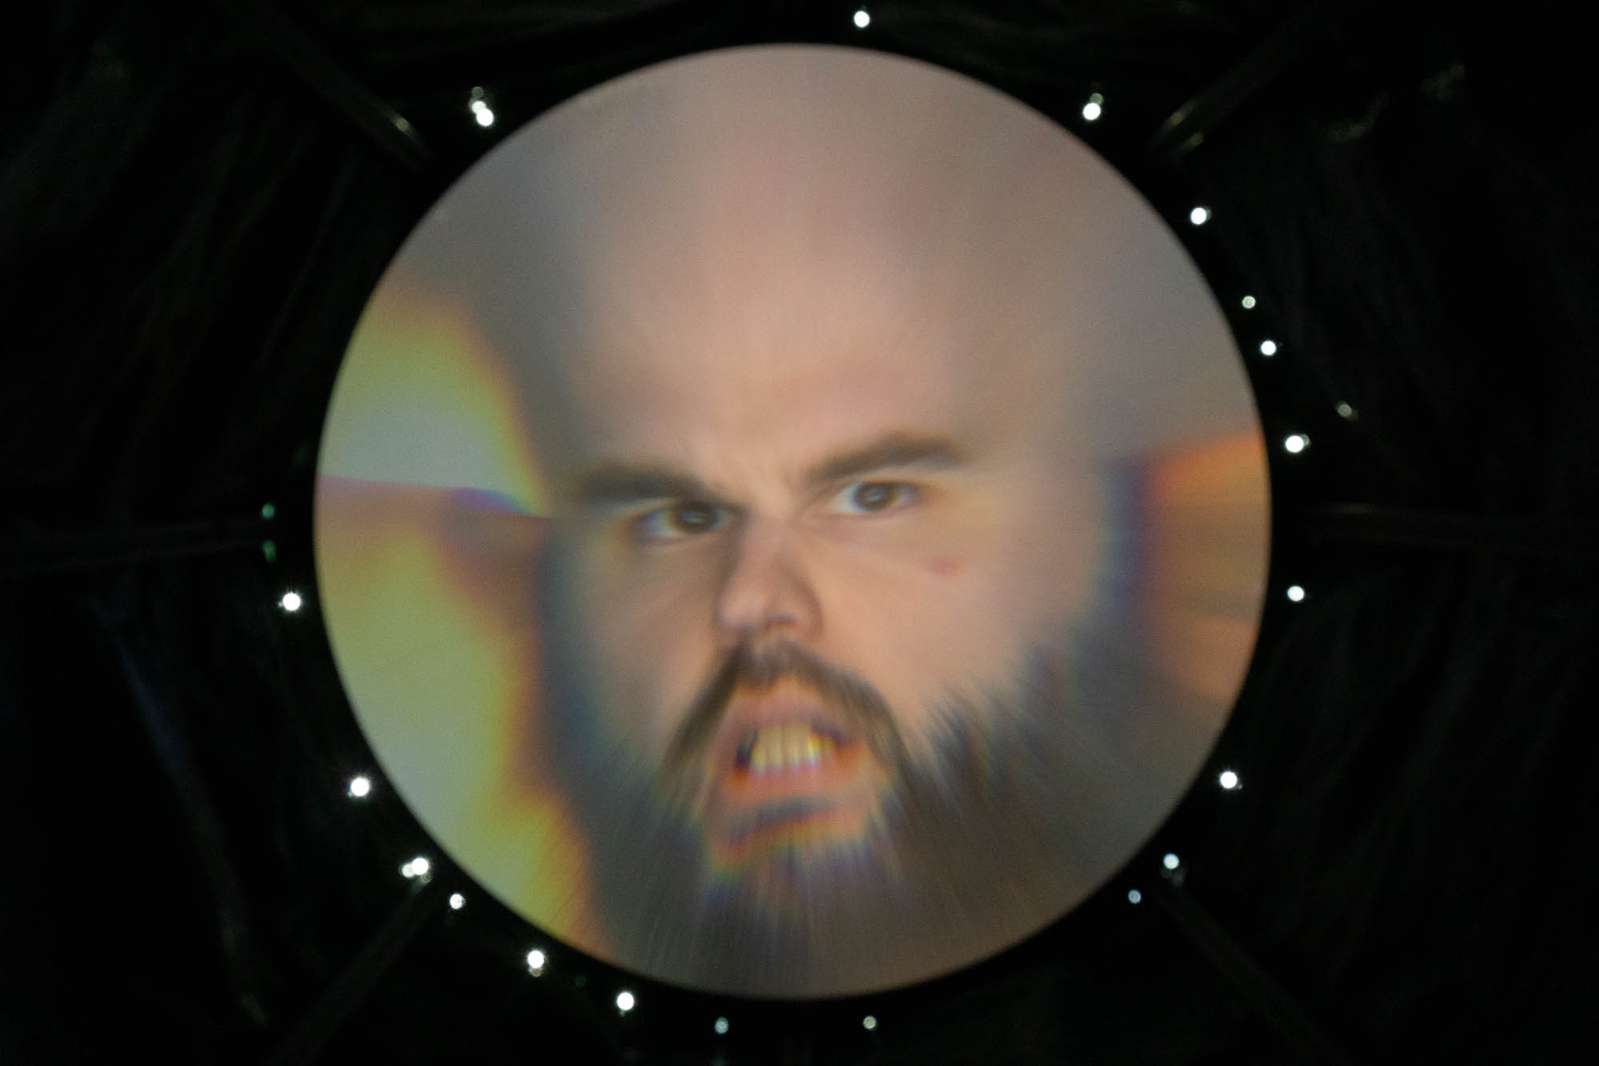
So, Is it funny? Well, you decide. Is it useful? Absolutely not2.
There is a research paper about camera models for hypercentric lenses which would allow you to do face 3d-reconstruction based on stereo reverse perspective images and so on, that might be slightly useful, but that’s not my main area of expertise.
Let’s talk a bit how one can build a giant hypercentric camera at home.
The Hypercentric Camera
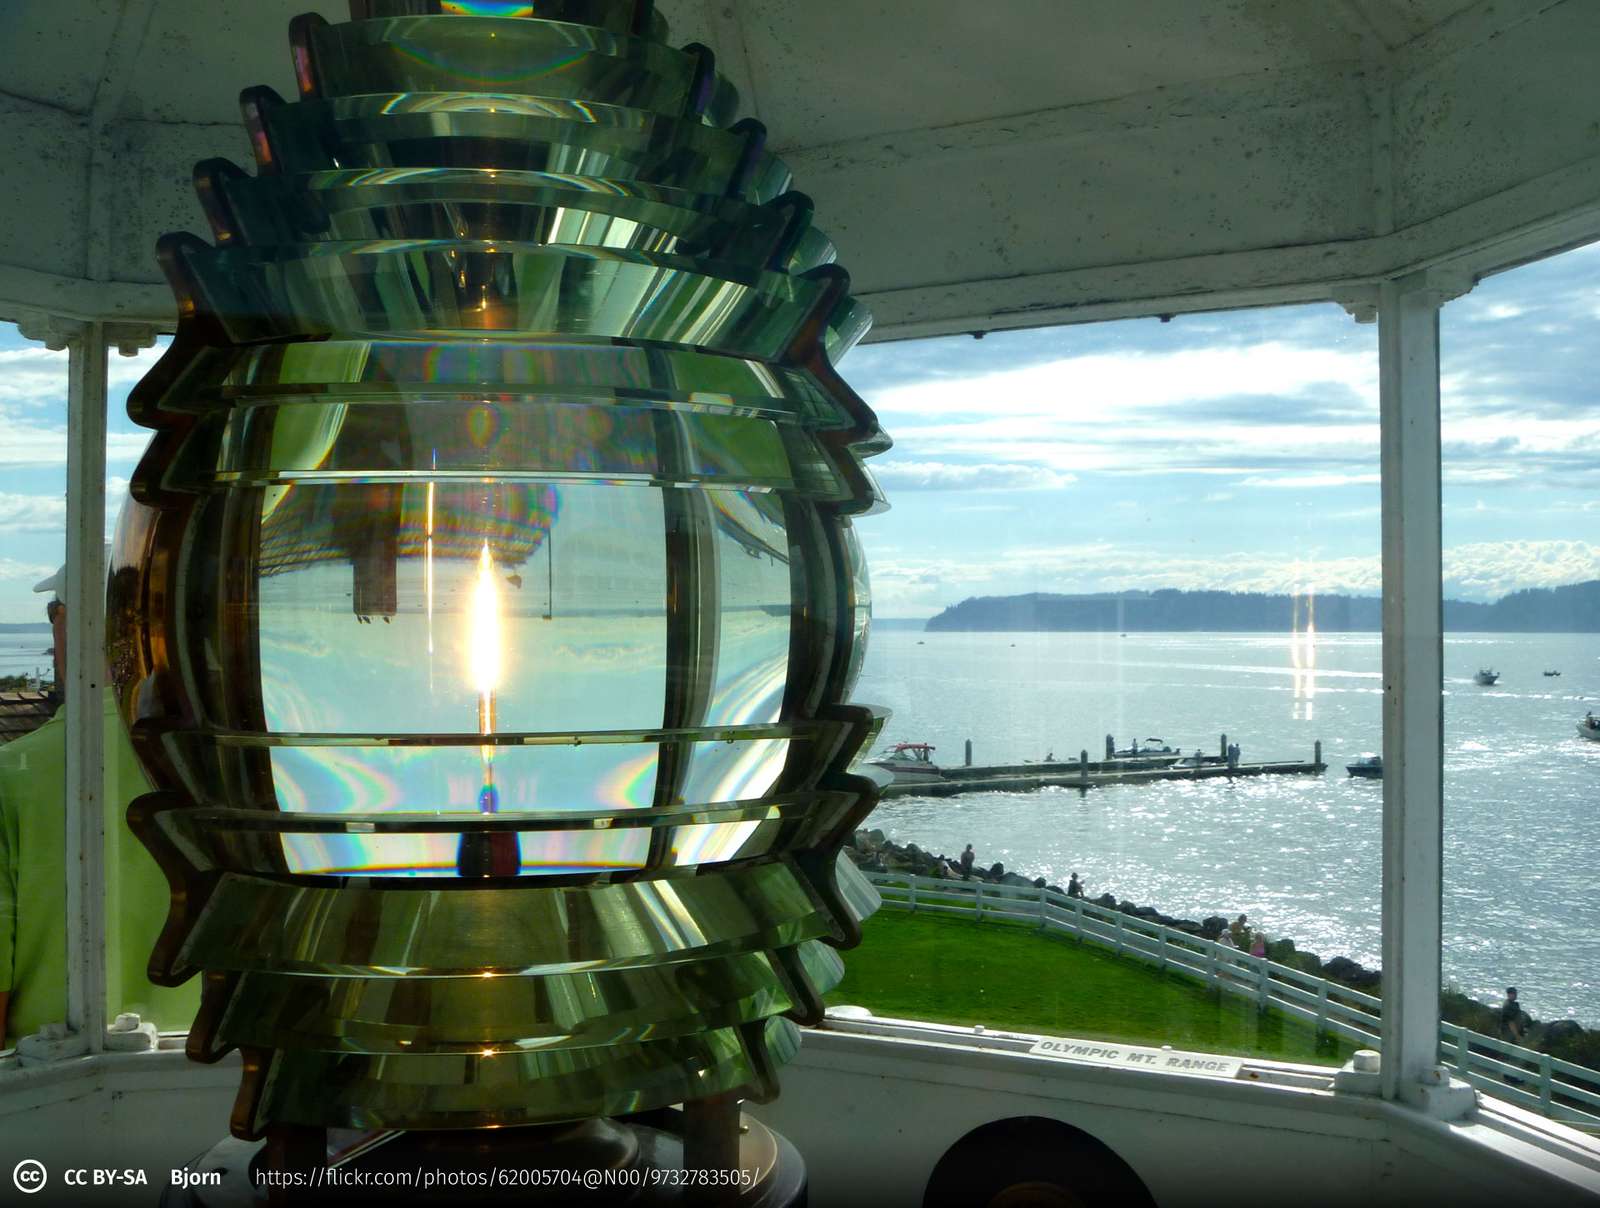
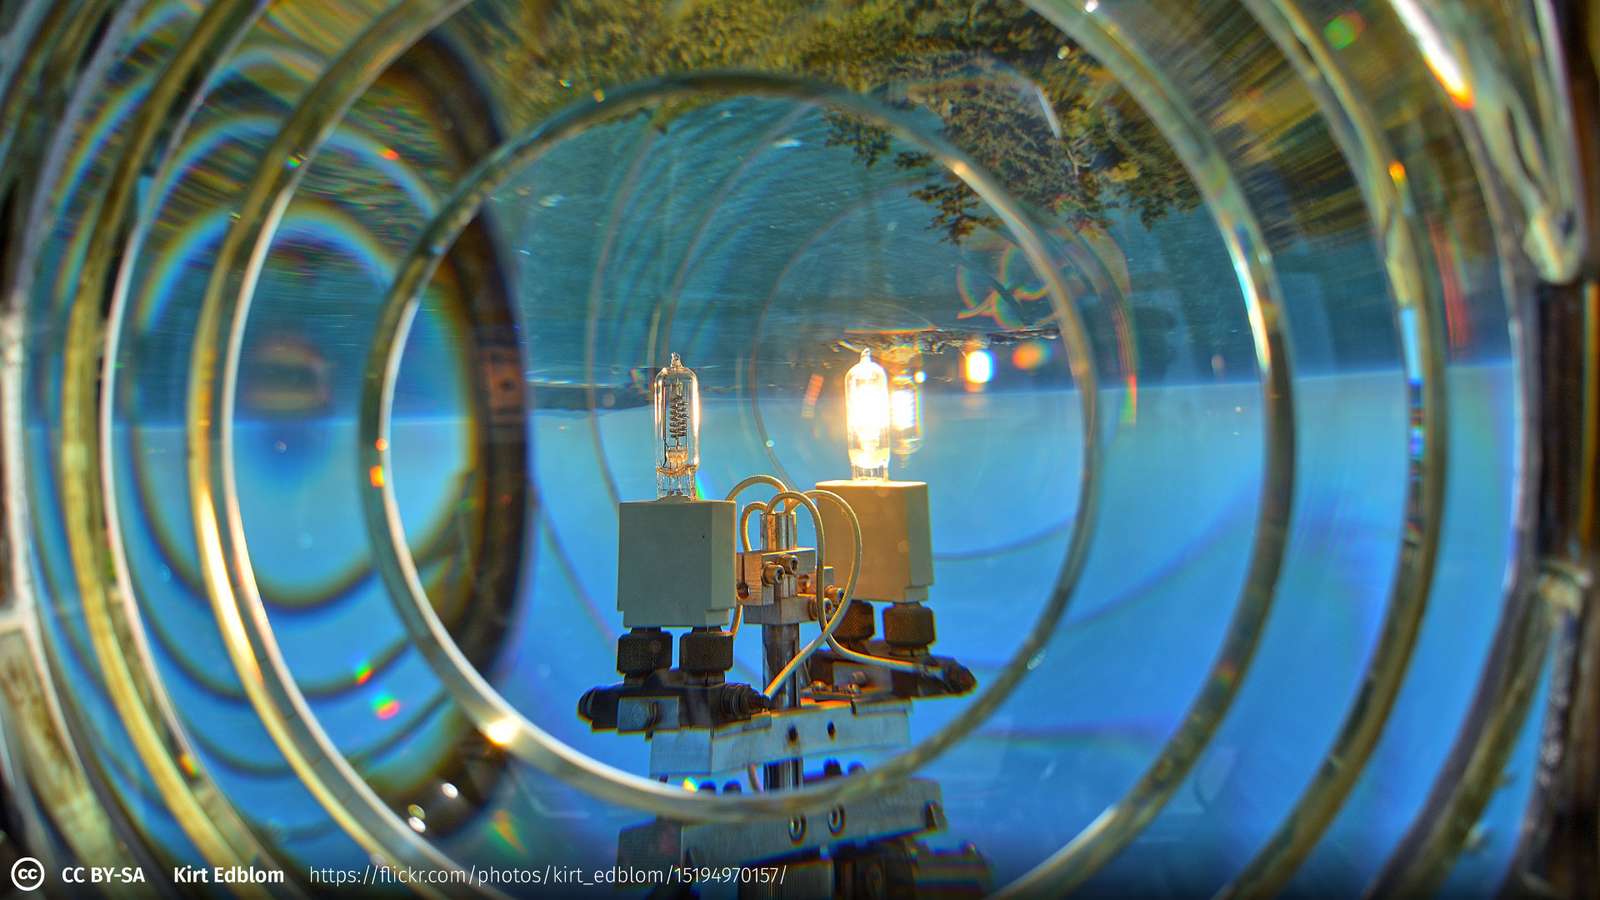
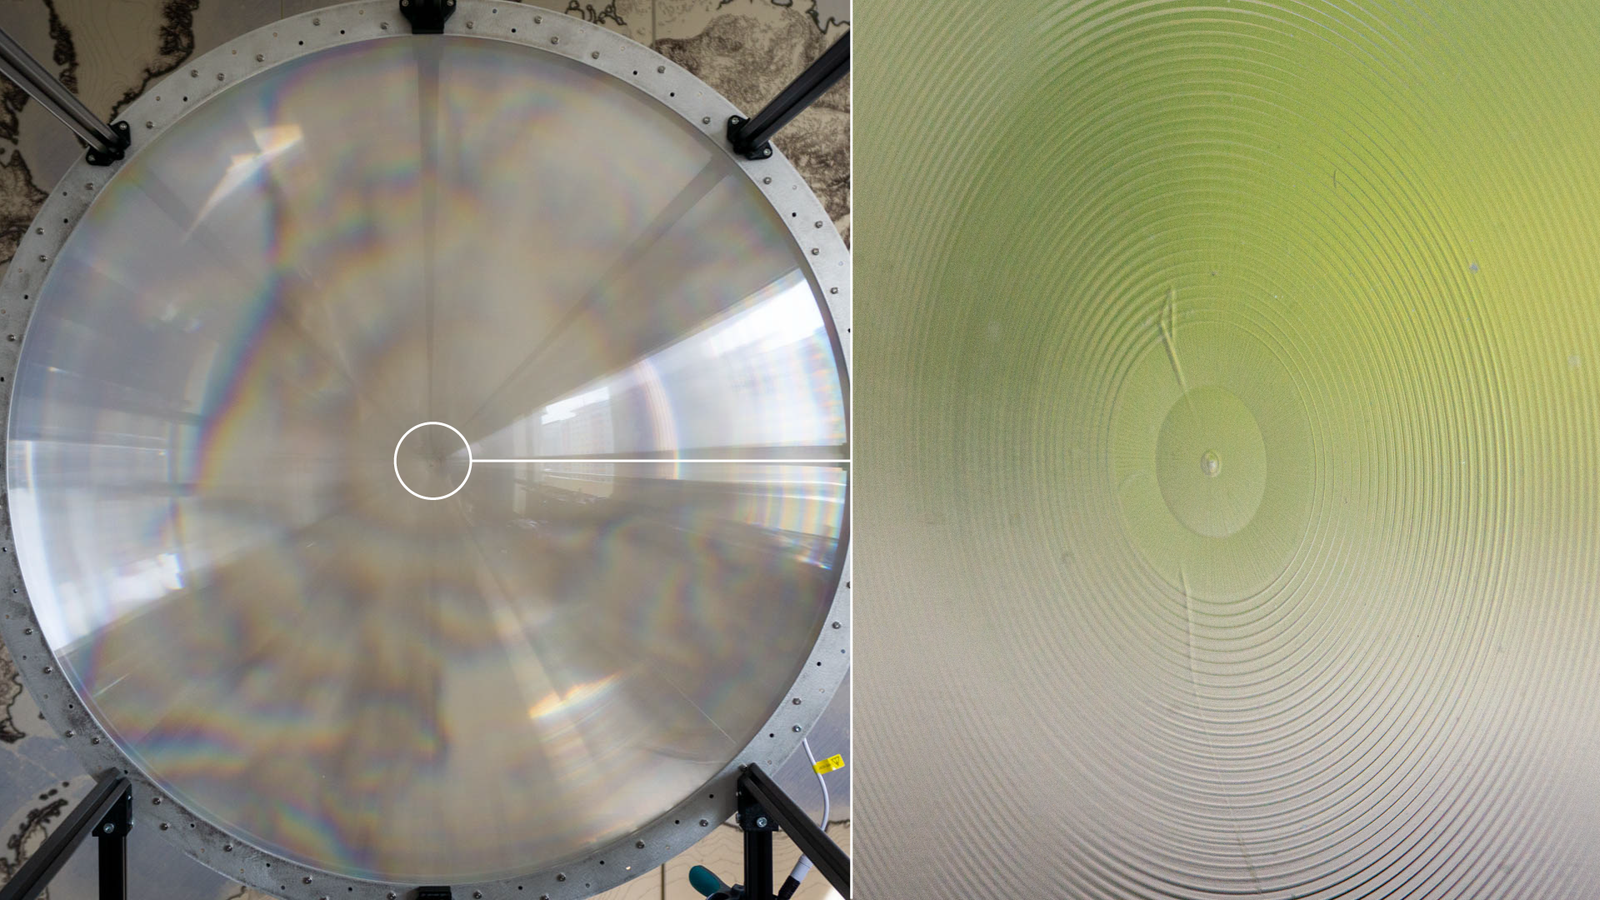
It’s pretty much impossible to buy a conventional lens larger than a human head so I had to go with a Fresnel lens. That’s a lens where so the surface is split into a lot of smaller segments.
That’s these gorgeous glass enclosures around the lights in lighthouses.
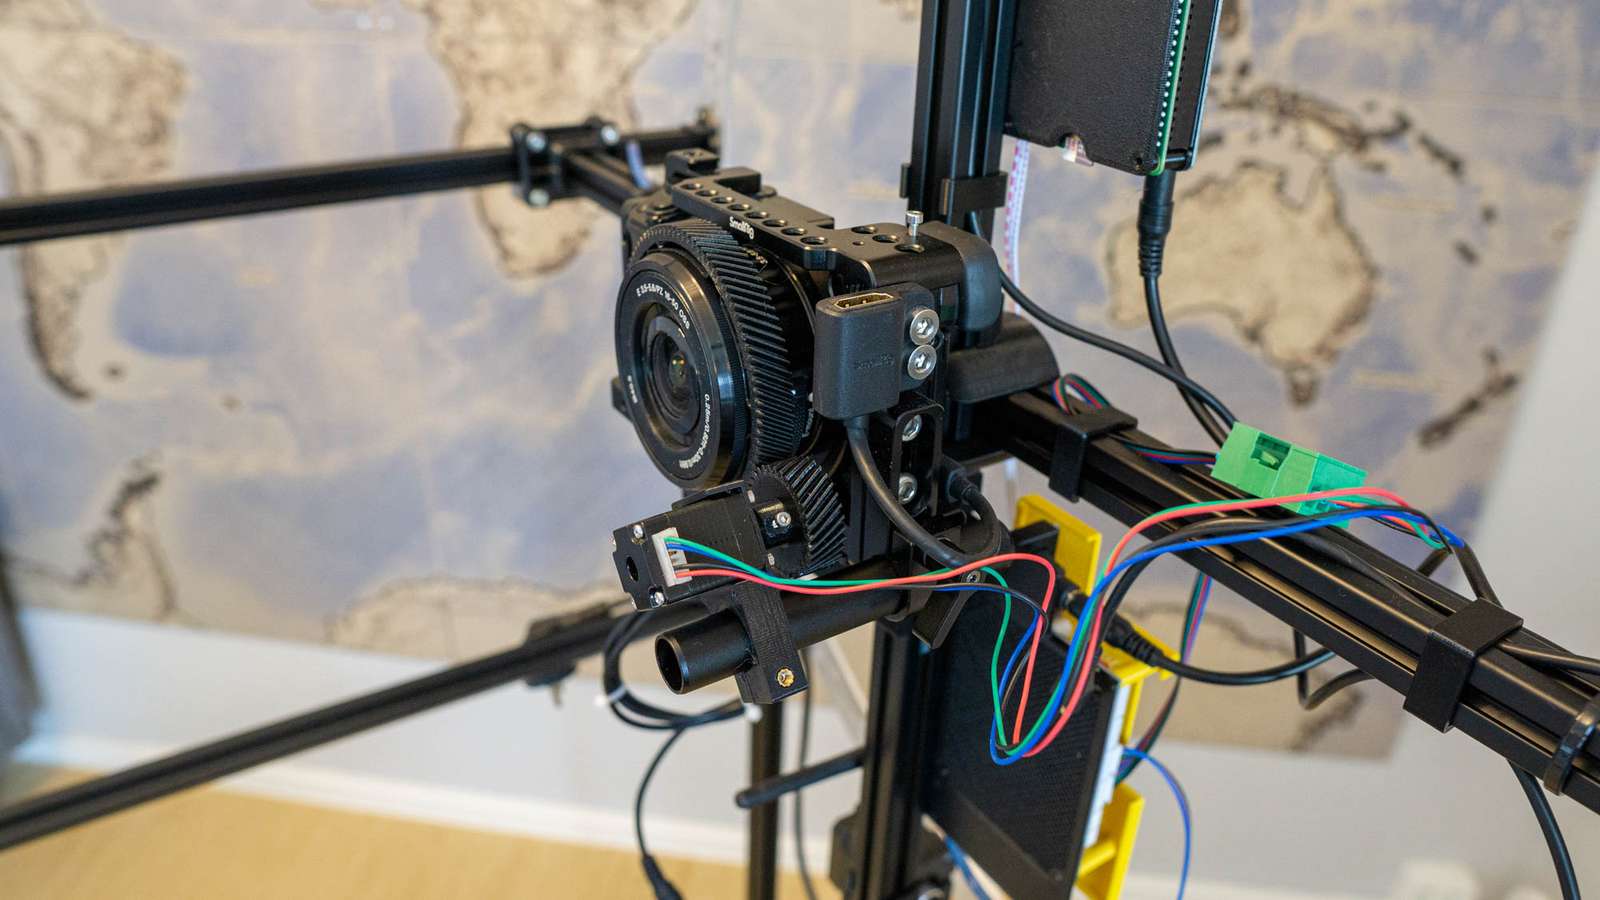
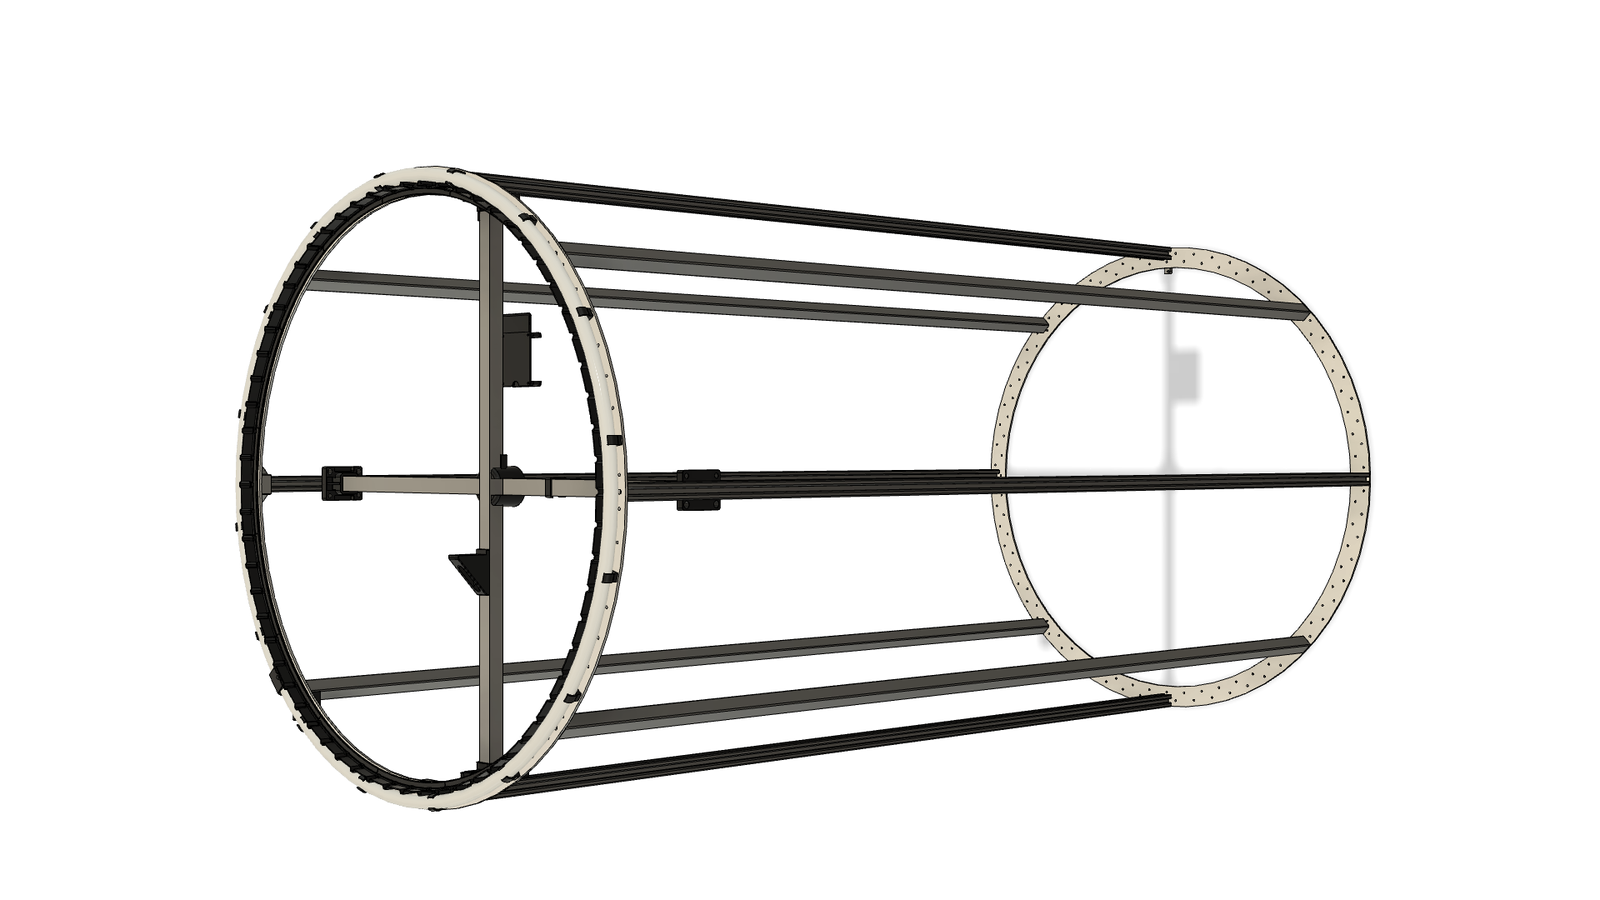
I built a lens enclosure with a small gantry where we mount our sensor.
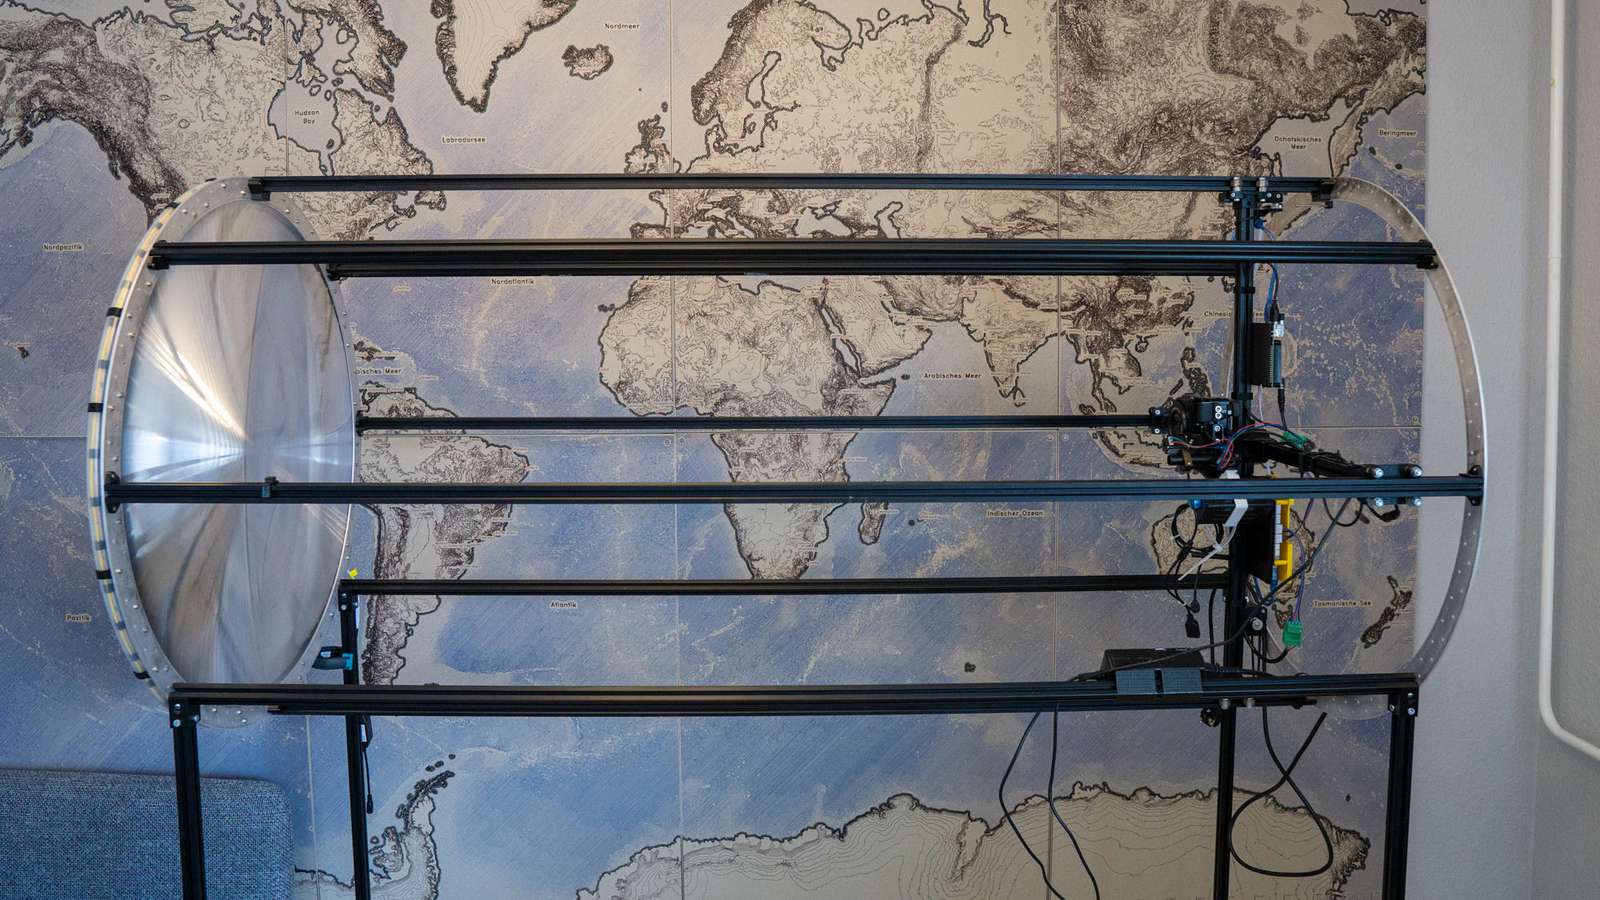
That’s just a regular camera with a zoom lens. The lens allows us to focus and provides the necessary aperture to make the optical system hypercentric.
The gantry runs on wheels so it can be moved along the enclosure. The lens has a focal length of 700mm, the enclosure has a length of 1500mm. If the camera is close to the Fresnel lens the effect should be minimal, while it should be perfect at a distance of about two focal lengths.

The rest of the enclosure is pretty simple: the gantry is driven by a stepper motor and a second motor is adjusting the focal length of the zoom lens. All of this is controlled by a Raspberry Pi mini computer. But moving the camera back and forth is just a nice gimmick to have this effect. Taking photos works without any motors.
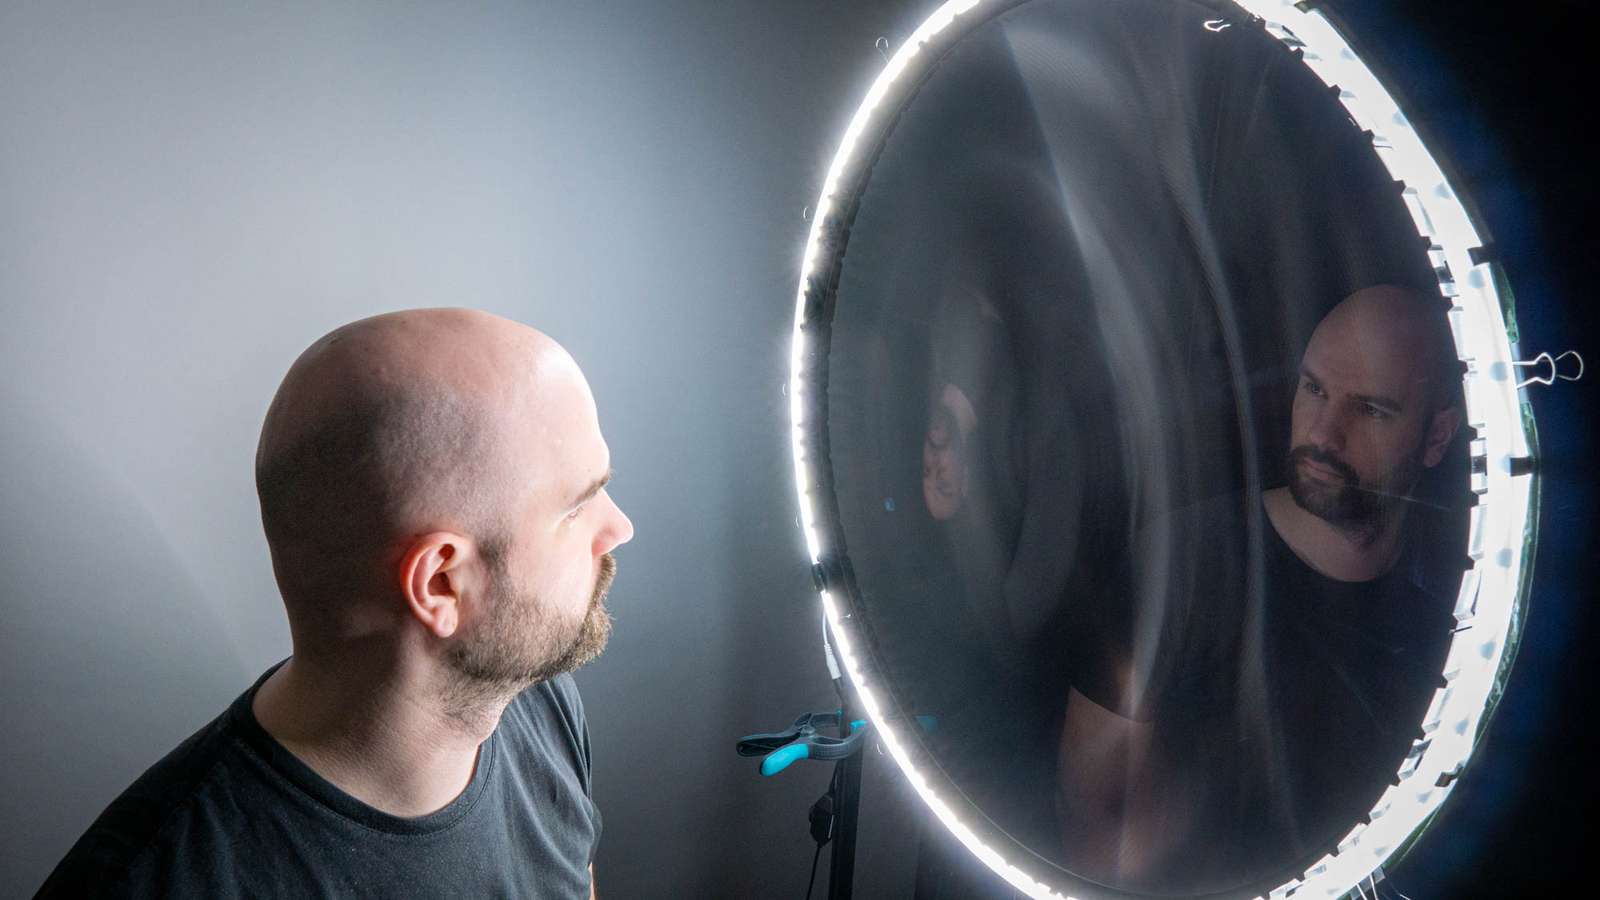
The lens will need a lot of light, so I am reusing a Hula Hoop ring as a diffusor for a LED strip, that’s our ring light. The front and back rings are laser cut and everything else are v-slot aluminium profiles and 3d-printed parts. The whole thing is placed on rollerblade wheels so it’s easy to move. I used some tarp I had lying around to make the enclosure light-tight because the Fresnel lens has no anti-reflection coating and just a tiny bit of stray light already looks horrible.
Parts and Fabrication
Fresnel: That’s the most tricky part. I got my Fresnel lens from Aliexpress. Choose the size that fits your needs and budget:
500mm diameter, 300mm focal length, 82.00+37.23€: link
700mm diameter, 700mm focal length, 234.55+39.85€: link
I bought the 700mm lens but I am not very happy with the manufacturer Ruite Professional Optical Trading Co. The lens had a few fingerprints on the side with the grooves and apparently the negative mold used for manufacturing had a few defects.
Alternatively, a lot of semi-modern televisions have a Fresnel lens to distribute the background light for the LCD screen. You might be able to do a bit of scavenging and find a good one (though it will be rectangular, of course).
Front and back plate: Laser-cut aluminium from Laserboost.com. Website works fine, packaging is good, result is great. If you are located in Europe I can highly recommend them. I chose 3mm-thick aluminium, you shouldn’t go any thinner.
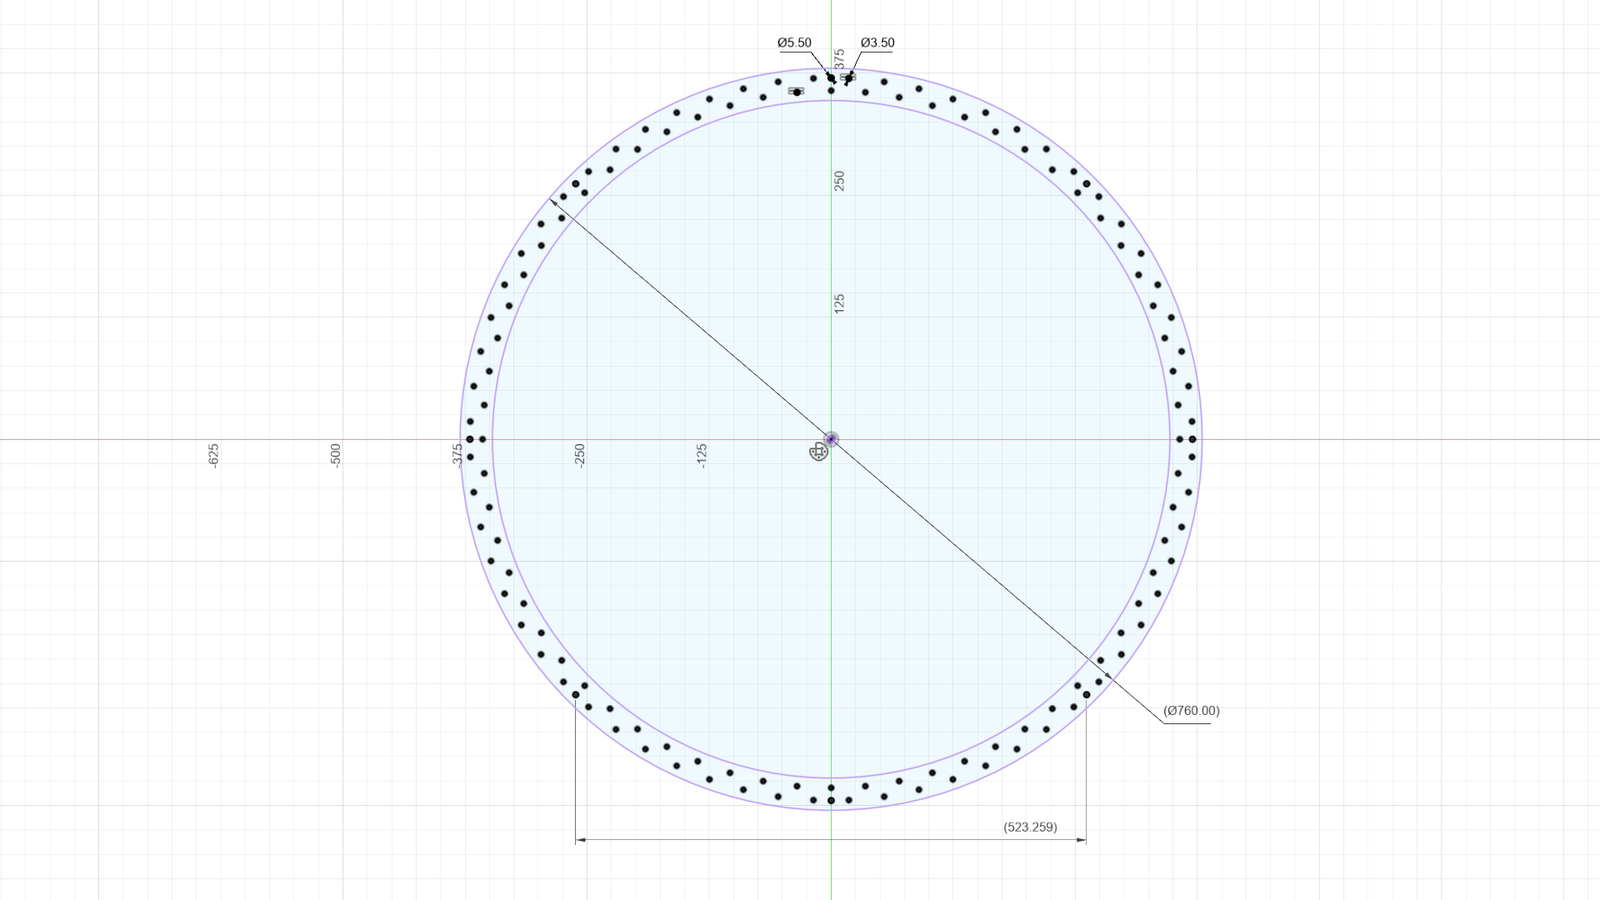
Aluminium profiles: OpenBuilds V-Slot at 1500mm length (the longest profiles that can be shipped by DHL without paying a hefty fee)
Controller: I am using a Fysetc E4 board with fluidNC to control the stepper motors. That’s the easiest and most convenient option. Starting a video or taking a photo with the camera is done via gphoto on a Raspberry Pi. But to be honest: not quite sure if it’s worth the hassle to motorize the gantry. I am using it almost exclusively on the most-distance-to-lens position anyway.
Illumination: 16mm OD polypropylene pipe as a diffusor for the LED strip. I bought it from Hula-Hoop-Shop.eu. Must be cut to length with a sharp knife and then it needs some pre-bending for a few days till it reaches the perfect circular shape.
Miscellaneous parts:
- 16x Mini V-Slot wheels by OpenBuilds. Requires 8x 6mm spacer, 8x eccentric spacers, and 16x 1mm shim.
- DIN912 M2, M3, and M5 screws. Various lengths.
- Mengs DC-38 Arca-swiss quick release clamp.
- A LED strip. I used GOMING 24V COB 4000k 5m from Amazon.
- 2m GT2 belt, width: 6mm. Can be bought from Amazon, AliExpress, and many other sources.
- Nema 17 stepper motor. I can recommend OMC-stepperonline.com.
- Various pulleys and idlers for GT2 belts from AliExpress.
CAD files: If you want to build something similar, you can find the CAD models here: Fusion360 project file F3D / STEP
Acknowledgements:
- Ben Krasnow from Applied Science made a video about hypercentric lenses. This is what got me started with this whole thing.
- Blenderartists forum user sungreen patched reverse perspective calculations into a recent version of blender. This allowed me to do a rendering of the hypercentric lens effect for the video. You can find the repository on gitlab: https://gitlab.com/sungreen/rcam3. The blenderartists thread has more info and two videos show the effect: video 1, video 2
Related things:
- Paul Bourke did a writeup on reverse perspective with blender and how that overlaps with byzantine art
- Markus Keinath did built his own DIY hypercentric lens
- Strange Lenses by Robb Godshaw and Max Hawkins are freeform lenses that do all kinds of funky stuff to faces (more info in an instructable)
- Reverse perspective paintings by Patrick Hughes
- The flickr group Face of Fugly dedicated to Fresnel lens portraits
- Fresnel box faces by Yuji Hayashi: https://dailyportalz.jp/kiji/160830197309
Misc:
- There is a video about restoration works on a lighthouse fresnel link after a kid took some potshots: Fresnel Lens Design and Manufacturing by Artworks Florida Classic Fresnel Lenses, LLC.
Fine print:
This post and all images/videos are licensed under CC BY.
(If not indicated otherwise. CC images/videos published by other people with different licenses are labeled as such. Public domain images are not labeled.)
You are free to Share — copy and redistribute the material in any medium or format and Adapt — remix, transform, and build upon the material for any purpose, even commercially. But you need to take care of Attribution — You must give appropriate credit, provide a link to the license, and indicate if changes were made.
See the FAQ for more info.
-
Well, technically, that’s not an effect of the focal length of the lens but of the distance from the subject and that’s a result of the combination of sensor size and focal length. ↩
-
At least not the one I built. In general hypercentric cameras seem to be used for some very specific inspection purposes, for example optically inspecting threads in a borehole. ↩